kitchen remodeling
How To Install Cabinet Filler Strips
by Andrew Saladino
May 1, 2020
Cabinet filler strips let you enjoy seamless cabinets that can extend along multiple walls in your kitchen. Without them, there would be unsightly gaps or the corner doors wouldn’t work very well. However, you can’t just throw them up in a few minutes. Let’s talk about how to install cabinet filler strips the right way.
What Are Cabinet Filler Strips?
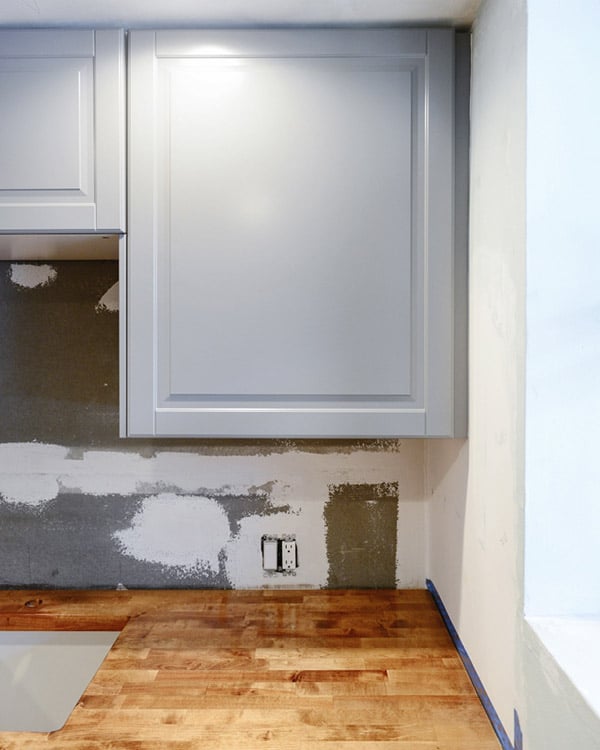
Cabinet filler strips are pretty self-explanatory–they are simply strips of wood that fill gaps in between cabinets and other objects. Most of the time, filler strips go in between the cabinets and the wall. While a wall may look straight, it’s probably not perfect. Most cabinets are designed to leave a small gap before the wall to account for this.
Filler strips can also be used to hide gaps around appliances. And if your kitchen cabinets use an L-shaped design, you might also use filler strips to cover the space where perpendicular cabinets meet. Cabinets need space for the doors to open, after all.
If you buy a cabinet set from a modern manufacturer, it should come with extra strips of wood in a matching finish that you can use for filler. But if the gap between the cabinets and the wall is too wide, or if you have too many gaps, you might need to buy more.
The first option is to call your cabinet manufacturer and order some new strips. You can also find primed or finished strips from home improvement stores like Lowes and The Home Depot. To select the right finish for your cabinet faces, you can bring in a cabinet door and ask for guidance in the store.
How To Install Cabinet Filler Strips Against A Wall

It would be rare to receive a filler strip that fits perfectly out of the box, so this job does require some work. Here are the tools you’ll need:
- Scribing tool
- Cabinet clamp or claw
- 3/16″ drill bit
- Cabinet screws with trim heads
- Belt sander
- Miter saw and table saw
And here are the steps for installing cabinet filler strips:
- Measure the gap between the wall and the cabinet. Measure the width both at the top and bottom of your cabinet and measure the height of your cabinet as well.
- Use a miter saw to cut the filler strip to the height of your cabinet.
- Use a table saw to cut the strip just slightly wider than the widest point you measured.
- Place the strip against the wall and clamp it to the cabinet with a cabinet claw.
- Use a scribing tool or a compass and pencil to transfer the contour of the wall to the filler strip.
- Remove the strip and use a belt sander to shape the strip to the wall contour. To make installation easier, put a negative angle on the wall-facing side so the front edge is slightly sharper than the back.
- Check how the cabinet filler strip fits in the gap. It should be a tight squeeze, and there shouldn’t be any more gaps between the filler and the wall. Go back to the belt sander if needed.
- Reclamp the sanded strip against the cabinet. Drill 3/16″ pilot holes through the cabinet box and partway into the filler strip. Use cabinet screws?not drywall screws?to attach the filler to the cabinet. You can also just use glue or silicone if the strip is smaller than three inches.
- If the strip is wider than six inches, you’ll want to use glue or silicone between the strip and the wall as well.
If you have a frameless cabinet design, your cabinets may have come with overlay fillers with bevels that match the edge of the doors. In this case, you’d attach a cabinet filler to the cabinet box in the same method described above, and then you’d attach the overlay filler onto that so the surface is flush with the doors.
How To Install Cabinet Filler Strips Between Corner Cabinets
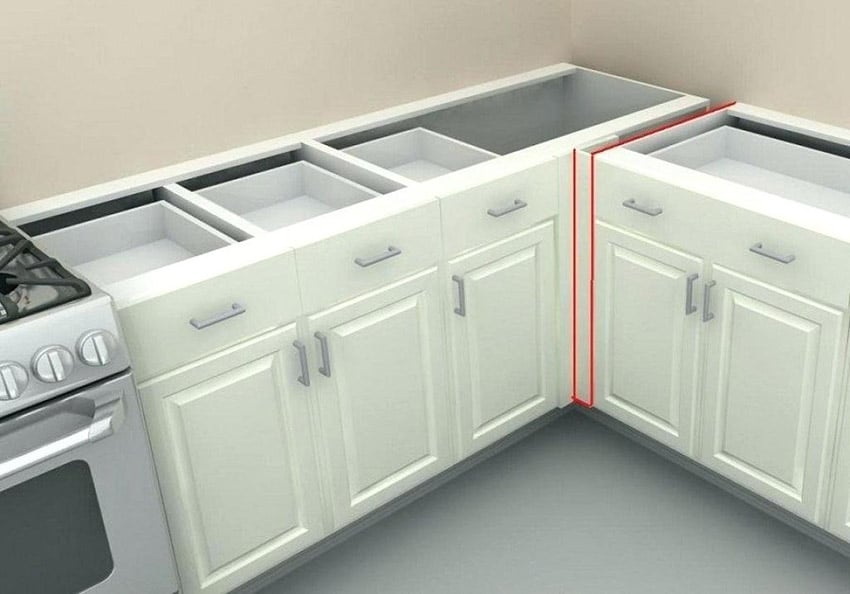
If you have an L-shaped kitchen, you’ll have base cabinets that meet together at the corner. Of course, they won’t meet up exactly, so there will be a gap. This is the same for upper cabinets.
It’s a bit easier to install cabinet filler strips in this situation. That’s because the cabinet faces should be straight, so you don’t need to scribe a line and sand down the filler strips. You’ll need two strips for this purpose. You can also use matching toe kick strips for filler.
Cut each strip to the height of the cabinets. Next, measure the distance the right angle will have to cover.
Let’s say your corner needs three inches of filler on each side to form the right angle. One piece of filler will need to be wider than the other by the thickness of the filler strips. If the strips are 1/2 inch thick, you’ll cut one strip to 3 inches and the other to 3 1/2 inches.
Join them together with L-brackets and screws, and then glue the edges to the sides of the cabinets. If you’re worried about weight, you can install a 1 by 2 backer board first and glue the fillers to that.
You can also cover the corner by using a filler board along the entire hidden side of your corner cabinet. It will come out to the doors of that cabinet. On the other side of the L, you’ll just need one strip of cabinet filler attached to the perpendicular cabinet box. For lower cabinets, this is often a smaller 12-inch drawer cabinet. You’ll want the space here so the drawers don’t come out and hit the handles of the corner cabinet.
Andrew Saladino
Andrew Saladino is the Co-Founder of Kitchen Cabinet Kings and has helped more than 10,000 customers design kitchens that are both stylish and built to last. Recognized by the NKBA for his expertise in kitchen design, he believes the secret to a successful remodel comes down to planning, patience—and plenty of caffeine.
![See your dream kitchen in 3D [GET YOUR FREE DESIGN]](https://cdn.kitchencabinetkings.com/blog/wp-content/uploads/see-your-dream-kitchen-in-3d.webp)
![Contractor Discount Program: Offering contractors and builders special volume discounts on all applicable orders [LEARN MORE]](https://cdn.kitchencabinetkings.com/blog/wp-content/uploads/contractor-discount-program.webp)
![Explore our photo gallery [GET INSPIRED]](https://cdn.kitchencabinetkings.com/blog/wp-content/uploads/explore-our-photo-gallery.webp)
![What everyone is saying about KCK [READ REVIEWS]](https://cdn.kitchencabinetkings.com/blog/wp-content/uploads/what-everyone-is-saying-about-kck.webp)
![Get a cabinet sample [SHOP SAMPLES]](https://cdn.kitchencabinetkings.com/blog/wp-content/uploads/get-a-cabinet-sample.webp)
![Pay over time, on your terms with Affirm [LEARN MORE]](https://cdn.kitchencabinetkings.com/blog/wp-content/uploads/pay-over-time-on-your-terms-with-affirm.webp)
Great article thanks for sharing. I’ve ran into issues with filler strips and needing to layout the cabinets first, measure carefully and the install for upper/lower alignment. Like using cabinet claws.
Thank you for sharing your knowledge