Kitchen
How to Get Rid of Pantry Moths Before They Devour Your Dry Goods
by Andrew Saladino
April 25, 2023
It’s always great when you open your home to friends and family. But there’s a difference between guests you invite over and those that show up unannounced and cause a nuisance in your pantry — and we aren’t talking about your children and their friends! One guest you don’t want showing up at your home is a pantry moth.
If you’re dealing with a pantry moth infestation, we understand how frustrating that can be. Not only are they annoying, but they are also destructive, often getting into and laying eggs on all the food stored in your pantry. At the first sign of a pantry moth, you must take the necessary steps to remove them from your home before the infestation spreads thoroughly.
Follow these three steps below to remove pantry moths from your home once and for all and prevent them from returning.
Step 1: Clean Out Your Pantry
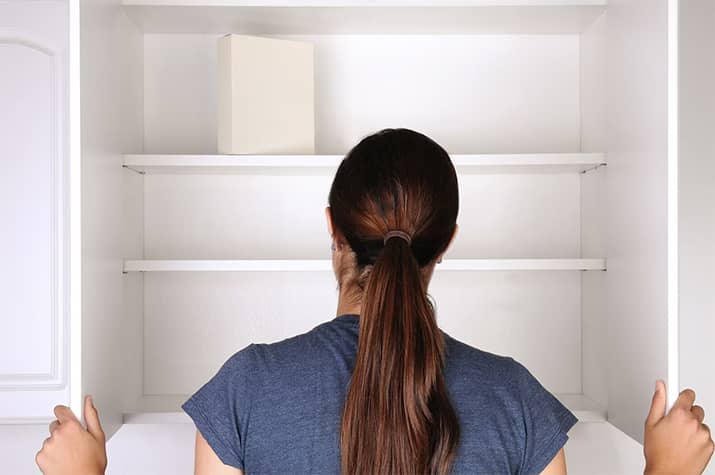
If you notice pantry moths or worms amongst the food in your pantry, it’s time to remove everything from the room (think of this as the perfect opportunity to reorganize the pantry!). Even if you think only a specific shelf or cabinet was infested, we recommend entirely taking out every item so it can be thoroughly inspected for webs or larval sacs. As you remove each item, check the bags and boxes for any signs of the moths, including under the lids of jars — even if you don’t think they were infested!
Pantry moths often seek out baking essentials, grains, pasta, and other dried goods stored in your pantry. However, they don’t discriminate and can get into sugary items or nuts. Whether you think it’s an item they are attracted to or on the same shelf as something else with eggs, all items should be thoroughly inspected.
Anything with any signs of worms or pantry moths should be thrown out (outside — not in your regular kitchen trash can!).
Step 2: Vacuum & Clean Your Pantry
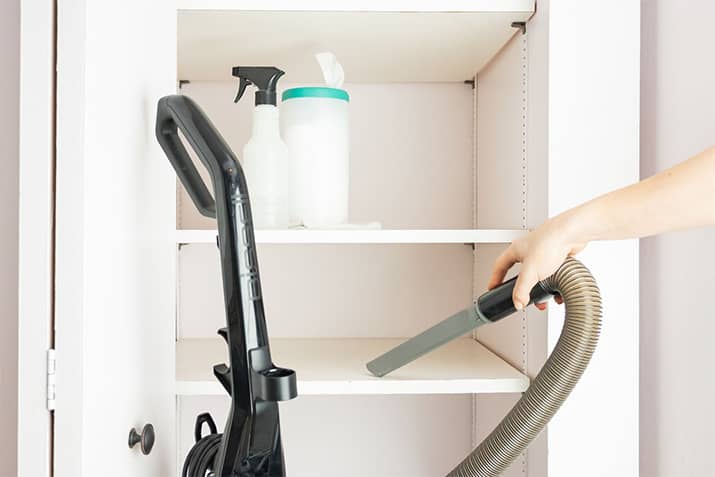
Now that you’ve removed all the items from your pantry, it’s time to clean it before using it to store food again — otherwise, you run the risk of a larger infestation. Use your vacuum to clean out every area in your pantry, including the floors, shelving, and cabinets. Spend extra time going over any nook, cranny, and crevice where the pantry moths may have laid eggs, such as baseboards, the underside of shelves, crown molding, and cabinet hinges. Put the vacuum debris in a trash bag placed directly in your outdoor bin.
After vacuuming, we recommend wiping down all surfaces of your pantry with an eco-friendly cleaning solution of white vinegar and warm water. This should be done on your floors, countertops, shelving, and cabinets to ensure that all areas that may have been affected by moth larvae have been thoroughly cleaned.
Step 3: Wait to Restock Your Pantry
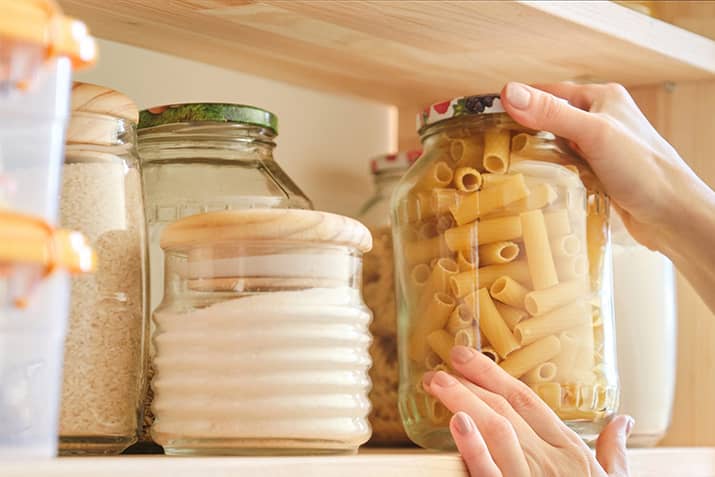
Great job cleaning out and wiping down your pantry. You may be in a rush to get your kitchen back to normal, however, we recommend against that. You don’t want to run the risk of having your entire pantry restock infested with pantry moths, so you must wait a few weeks before restocking your pantry.
Before introducing food back into your pantry, you want to be sure that the problem has been removed. If you accidentally miss any eggs or larvae during the cleaning process, your pantry will quickly become infested again. Instead, use patience and wait to restock the space. If you notice signs that pantry moths may still be present, repeat the cleaning process above until you are satisfied with the results.
After a few weeks, you can begin using your pantry again. Make sure you inspect any groceries or items that you are placing in the pantry to ensure you aren’t bringing in any pests from the outside world. You may even want to transfer dried goods from the bags or boxes into jars or other containers, making it more difficult for worms or moths to get into the rest of your food if a particular good was infested.
Frequently Asked Questions
What causes pantry moth infestations?
Even though you’re well-equipped to remove pantry moths from your home, the easiest course of action is to prevent them from entering your home. Pantry moth infestations often happen when a contaminated product at the grocery store or packaging plant is brought home. If the eggs or worms aren’t found upon bringing the item home, they will infest your panty.
Will pantry moths go away on their own?
You may be hoping that if you simply ignore the problem, it will disappear. However, pantry moths will continue to lay eggs and spread in your home, feeding off of your grains and other dried goods until they are removed.
How long does it take to remove pantry moths?
There isn’t a set amount of time it takes to remove pantry moths. Ultimately, it depends on how widespread the infestation was. The shortest time would be a few weeks while you wait to ensure you thoroughly cleaned out the pantry. However, if the infestation is large enough, it may take a few months for you to be sure that all larvae have been removed.
Do pantry moths bite?
There are few things more frustrating than pests and insects infesting your home. While pantry moths will wreak havoc on the dried goods in your pantry, they are not known to cause any issues for individuals living within the home.
How do I kill pantry moths?
You may be wondering what kills pantry moths. To entirely remove them from your home, you need to clear out any of the moths and their eggs to prevent the infestation from spreading. Then, you must clean out your pantry with a vacuum and cleaning solution — you may want to include peppermint in the cleaning solution because pantry moths are known not to like peppermint. You can also place any infested items in the freezer for 48 hours to kill off any larvae and prevent them from spreading.
Andrew Saladino
Andrew Saladino is the Co-Founder of Kitchen Cabinet Kings and has helped more than 10,000 customers design kitchens that are both stylish and built to last. Recognized by the NKBA for his expertise in kitchen design, he believes the secret to a successful remodel comes down to planning, patience—and plenty of caffeine.
![See your dream kitchen in 3D [GET YOUR FREE DESIGN]](https://cdn.kitchencabinetkings.com/blog/wp-content/uploads/see-your-dream-kitchen-in-3d.webp)
![Contractor Discount Program: Offering contractors and builders special volume discounts on all applicable orders [LEARN MORE]](https://cdn.kitchencabinetkings.com/blog/wp-content/uploads/contractor-discount-program.webp)
![Explore our photo gallery [GET INSPIRED]](https://cdn.kitchencabinetkings.com/blog/wp-content/uploads/explore-our-photo-gallery.webp)
![What everyone is saying about KCK [READ REVIEWS]](https://cdn.kitchencabinetkings.com/blog/wp-content/uploads/what-everyone-is-saying-about-kck.webp)
![Get a cabinet sample [SHOP SAMPLES]](https://cdn.kitchencabinetkings.com/blog/wp-content/uploads/get-a-cabinet-sample.webp)
![Pay over time, on your terms with Affirm [LEARN MORE]](https://cdn.kitchencabinetkings.com/blog/wp-content/uploads/pay-over-time-on-your-terms-with-affirm.webp)


