Bathroom
How to Install a Bathroom Fan: 7 Steps For an Easy DIY
by Andrew Saladino
July 17, 2023
Are you tired of stepping out of your shower and dealing with endless moisture in your bathroom? Although it may only seem like a minor inconvenience, too much moisture in the bathroom can cause damage, or worse, can lead to mold. Installing (or replacing) a bathroom exhaust fan is the ideal solution to help mitigate your moisture issues because it helps to remove moisture, heat, and odors from the space.
Although installing a bathroom exhaust fan isn’t the easiest of do-it-yourself projects, it is possible for you to do it yourself with the proper tools and plan of action. There’s no need to be nervous about taking on this project on your own. To help you feel confident installing a bathroom exhaust fan, Kitchen Cabinet Kings has provided you with step-by-step instructions outlining seven necessary steps to ensure a seamless installation.
Step 1: Mark the Location of the Fan

If you don’t have an existing bathroom exhaust fan that you are replacing, you will need to determine where on the ceiling you plan to install the new exhaust fan. Depending on the existing lighting in your bathroom, you can opt for a dual light and exhaust fan or a separate exhaust fan during your bathroom remodel. However, if you are doing a separate exhaust fan you need to install it near the existing light fixture because it will take power from the light fixture’s wiring.
To determine the proper ceiling placement near the light fixture, use a stud finder to locate the joists in the ceiling. Your exhaust fan should be positioned directly between the two joists to ensure its weight is supported. Once you’ve determined where you want to install the bathroom fan, lightly trace the fan on the ceiling so you know exactly where you need to cut.
Step 2: Cut an Opening for the Fan
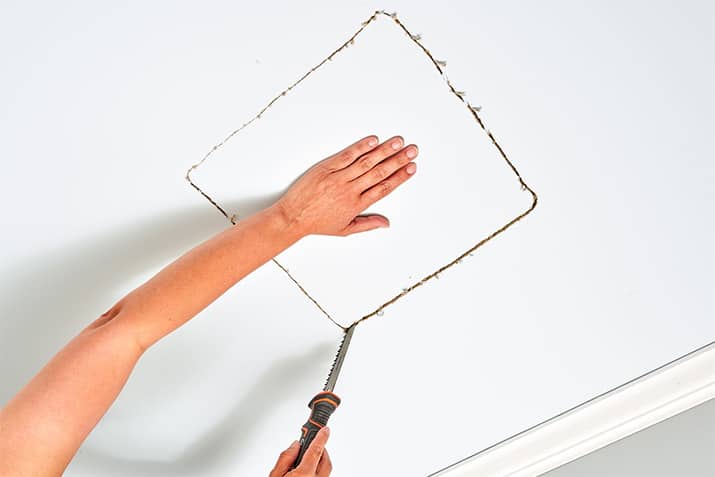
Now that you know where you plan to install the exhaust fan, it’s time to cut a hole in the ceiling where it will go. However, you need to make sure the electrical is cut off to the master bathroom before beginning this step to prevent the risk of electrocution if you hit a wire in the ceiling. Using your electrical circuit breaker, turn off the circuit that provides light to your bathroom. Once the power is turned off, you can begin using your drill to make small holes on each corner of the traced outline to make the cutting process a bit easier. Then, use a drywall saw to cut from corner to corner and remove the drywall to reveal the hole where the exhaust fan will be placed.
Step 3: Install a Ventilation Duct
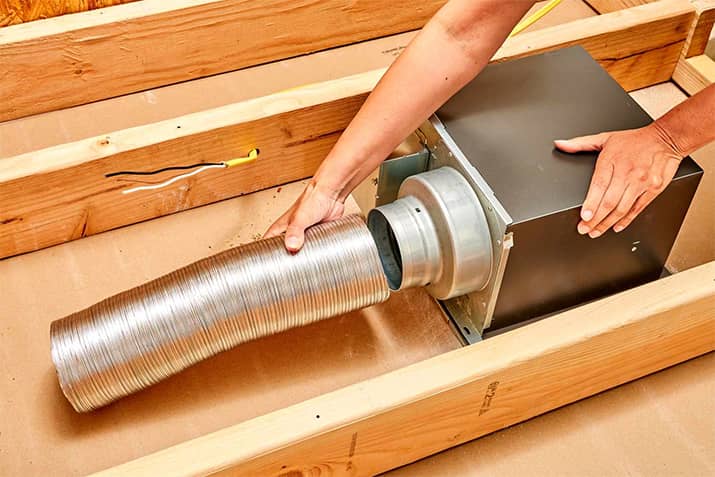
The purpose of installing a bathroom exhaust fan is to add ventilation to the space, allowing heat and moisture to properly dissipate. This means that you can’t just place the fan in the ceiling and expect it to work — you need to install a ventilation duct for the ceiling fan so it can properly funnel heat and moisture out of your home. In most instances, it’s best to have the ceiling fan vented through a roof vent.
For the ventilation duct, we recommend using a flexible aluminum hose that is approximately 4″ in diameter (unless otherwise specified in your exhaust fan installation kit). Once you have your supplies, look through the hole that you cut in the ceiling to find the closest exterior wall. Move the hose into the space and adjust it until it reaches the entrance to the ceiling and the exterior wall.
Step 4: Cut a Hole for the Exterior Vent
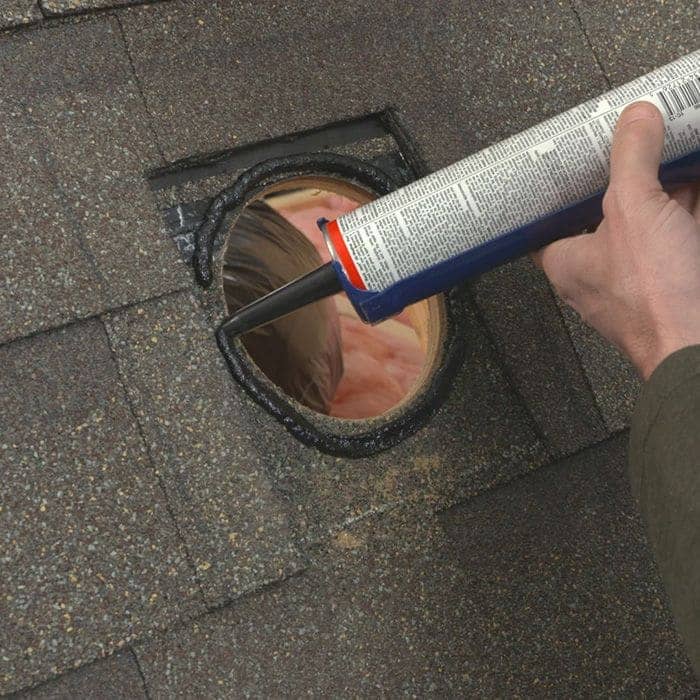
Next, you’ll need to safely make your way to your roof bringing a vent cap and tools, such as a reciprocating saw, cordless drill, and silicone caulk. Using the saw, cut a small hole in the roof where you lined up the hose. Once the hole is made, you can attach the vent cap with screws and then outline it with the silicone caulk to prevent any water from leaking into your home.
Step 5: Attach the Exhaust Fan to the Joists
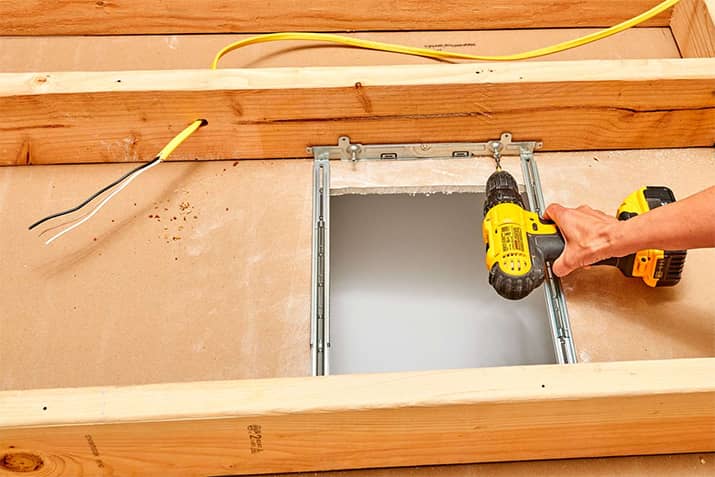
Next, it’s time to attach the exhaust fan in place. Head to the attic and hoist the fan into the hole you created in the drywall so it is flush with the ceiling and fasten it to the joists. We recommend having a family member or friend assist with this step as it can be difficult to get it properly in place and screw it in at the same time.
Step 6: Make Electrical Connections
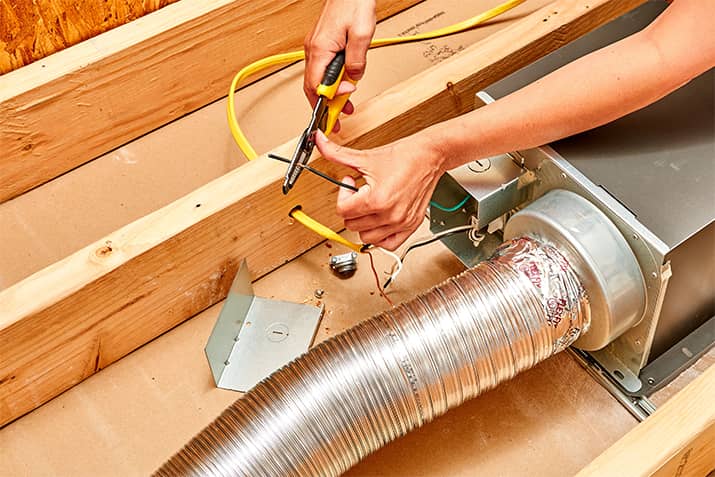
Before leaving the attic, connect the ventilation hose from the backside of the ceiling fan to the vent cap in the roof, ensuring the proper flow of moisture out of your bathroom. Then, it is time to make the electrical connections for the new exhaust fan.
Note: if you don’t want the fan to turn on with the light, you will need to update the wiring and install a double switch. To do this, run a 3-wire cable from the new exhaust fan to the existing switch and swap out the old switch for a double switch in the electrical box.
Once the double switch has been installed, it’s time to connect the exhaust fan wiring to the existing ceiling fixture wiring. Use 12/2 electrical wire and twist one end with the black and white wires of the fan unit. Then, hook up the black and white wires at the other end of the cable to the matching wires on the light fixture to power your exhaust fan.
Step 7: Turn the Circuit Breaker On
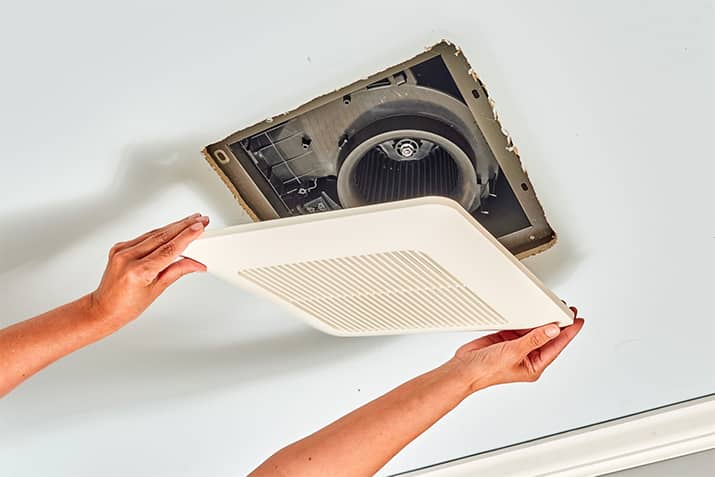
After the exhaust fan is wired, add the fan grill plate to the face of the exhaust fan. Then, you can turn on your circuit breaker to restore electricity to the bathroom. Flip the switch for the fan and enjoy a moisture-free bathroom.
Frequently Asked Questions
Do bathroom exhaust fans need to be vented outside?
It is recommended to have a bathroom exhaust fan vent outside when possible. However, it does not need to be through your ceiling/roof if that is not feasible with the location of your bathroom. You can install a vent in the sidewall of your home with a wall-mounted exhaust fan.
Is a bathroom exhaust fan required?
You do not need a bathroom exhaust fan. However, an exhaust fan works to keep your bathroom properly ventilated due to the amount of moisture it experiences. If the moisture has nowhere to go, you may find yourself with bathroom odors, mold, and mildew that can be remedied by plants.
How do you vent a bathroom with no outside access?
Sometimes your bathroom may not have access to an exterior vent. If the location of your bathroom is in the middle of your home and it only has internal walls, you can install a central exhaust fan that helps funnel the air outside through ventilation shafts.
When should I turn on a bathroom exhaust fan?
You do not need to leave your bathroom exhaust fan turned on all the time. Instead, we recommend using it when taking a shower or bath — or doing anything that introduces a lot of moisture in the air. Overusing your fan will use excess energy and can result in a more expensive energy bill.
Andrew Saladino
Andrew Saladino is the Co-Founder of Kitchen Cabinet Kings and has helped more than 10,000 customers design kitchens that are both stylish and built to last. Recognized by the NKBA for his expertise in kitchen design, he believes the secret to a successful remodel comes down to planning, patience—and plenty of caffeine.


