Home
How to Paint Tile: 4 Steps for a Bespoke Look
by Andrew Saladino
March 22, 2024
Do you dread stepping foot in your kitchen because of the outdated eyesore that is your backsplash tile? Or maybe it’s the forgotten half bathroom or uninspired laundry room that feels like you’ve never left the 90s? You know what we’re talking about — the tile that was already in your home when you moved in that you can’t stand the sight of. If you’re tired of tile that doesn’t reflect your taste or style like the rest of your home, it doesn’t have to stay that way.
If you’re not ready for the commitment and cost of fully replacing your tile, we have an affordable do-it-yourself project for you to try — painting your tile! Giving your outdated tile a fresh coat of paint can dramatically enhance the look of your space while giving it a pop of personality. Plus, it’s a relatively quick DIY project that you can knock out in a single weekend.
Follow along as we walk you through the process of painting tiles in four easy steps, whether it’s on your floors, backsplash, or countertops.
Step 1. Prepare the Space
We know the excitement that comes with starting a new DIY project. You likely want to dive right in! However, for ease throughout the paint job, it’s best to prepare the space first so you can seamlessly move from step to step. Start by clearing the space around the tile that you plan to paint.
Put away any clutter on the floors or countertops to reduce the risk of paint splatter from causing any damage. If you are tackling your backsplash, tuck away any countertop kitchen appliances, stray dishes, and décor. If it’s the floor you’re after, move away any furniture that may interfere. When it makes sense, we recommend using a drop cloth to cover surfaces, floors, or other nearby furniture from paint.
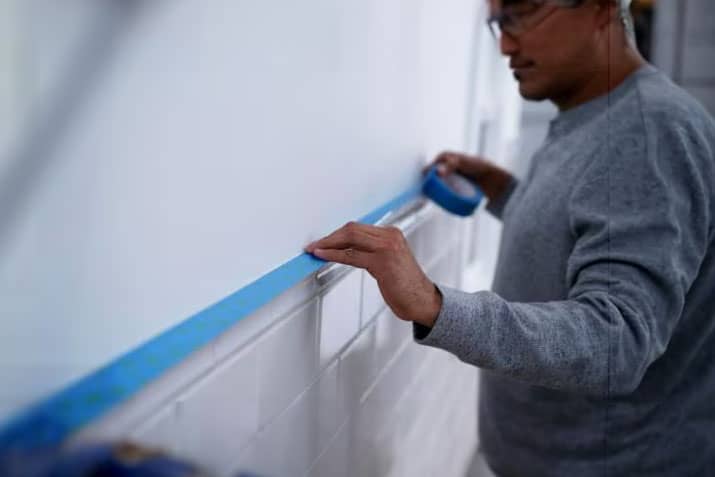
Certain items, such as your countertops or baseboards, cannot be moved out of the way. Use painter’s tape to create a barrier between these areas and the tile to prevent paint from transferring to them during the painting process.
Step 2. Clean the Tile
Although this step is the most time-consuming, it’s one that you don’t want to cut corners on. Preparing your tile is key for a high-quality paint job. First things first, we recommend starting with a standard cleaning of the tile. Using a tile degreaser, scrub the tile with a bit of elbow grease to ensure that you start with a clean slate. Following the degreaser, switch to a solution of soap and water as you continue scrubbing all of the tiles (including the grout). If any residue, dust, or dirt remains and you end up painting over it, you may find yourself with an imperfect result. Once the tile has been thoroughly cleaned and rinsed off, allow the tile and grout to dry completely before moving on to the next step.
Step 3. Prep the Tile
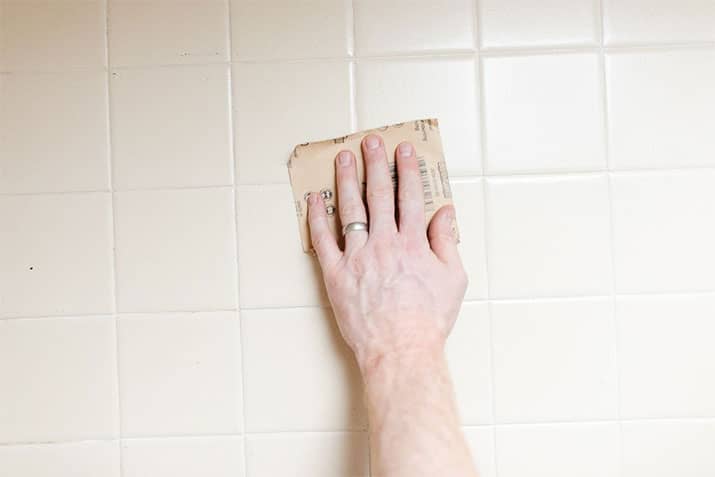
After allowing the tile and grout to dry, it’s time for caulk. This step is crucial to fill in and repair any chips or cracks hindering the paint job. Once the caulk is applied, use a sander or sandpaper to sand down your tile for a smooth and even surface.
Now that your tile has been repaired and smoothed down, it is time for you to prime the surface. This ensures you will not experience any scuffs or chips in your painted tile down the road. We recommend using a high-quality bonding primer and follow the manufacturer’s instructions for best results. In most cases, you should apply one coat if the tile is porous and two coats if it is glossy. Allow the primer to dry before moving on to the next step — painting!
Step 4. Apply the Paint
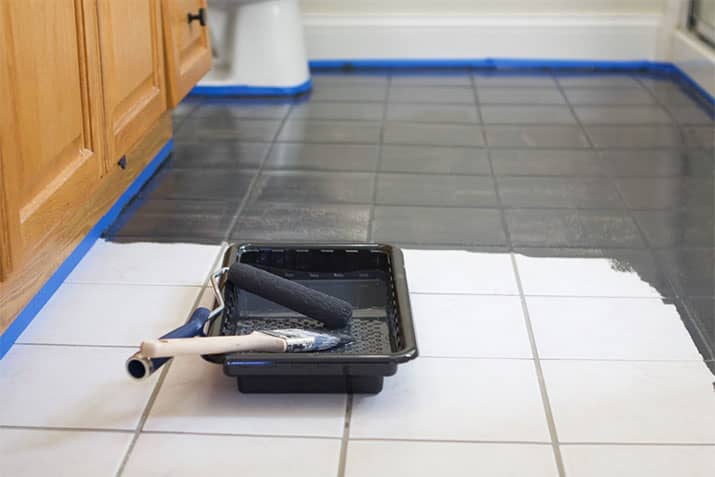
Now it’s time for the moment you’ve been waiting for! It’s time to paint the tiles and finally bring your vision to life. Remember you can’t just go to your local hardware store and grab any type of paint. For best results, you should only paint your tile with a special latex, oil, or epoxy paint that will more easily adhere to the tile surface. Once you’ve narrowed down the type of paint you will use and the color that will offer a splash of your personality, it’s time to get started.
We recommend using a roller to paint over the tile and grout to ensure evenness. If any paint collects in the grout between the tiles, you can swap it for a smaller brush to help smooth it out. Allow the paint to dry for at least 24 hours, but 48 hours is optimal. From there, you can either be done with the project, add another coat for full coverage, or go back in with a different paint overtop to add a custom pattern. If you want to add a pattern, a stencil will allow you to create a cohesive pattern.
After allowing the paint to fully dry, you can move your furniture and other items back in place to admire your handiwork.
Frequently Asked Questions
Can I paint any type of tile?
Most types of tile, including ceramic and porcelain, can be painted. However, for optimal results, it’s essential to properly prepare the surface and choose the right type of paint.
How long will the painted tile last?
If they are taken care of correctly, your newly painted tiles can last for several years without significant wear or chipping. However, the location of your tile may impact its longevity. Floor tile in a highly trafficked part of your home will be more prone to wear and tear than a tile backsplash in a powder room.
Can I paint floor tiles in high-traffic areas?
You can paint floor tiles in high-traffic areas, but it’s important to spend extra time prepping them. You should opt for high-quality supplies and apply multiple coats for added protection. To enhance the look of the space and protect your painted tile, you can invest in an area rug to reduce wear and tear.
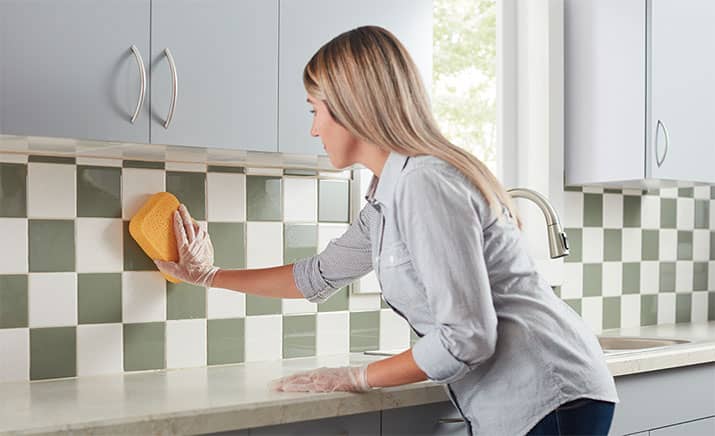
How do I clean painted tiles?
After painting your tile, you want to keep it looking its best for many years to come. To clean your painted tile, use a mixture of soap and water and apply it to the tiles with a soft sponge. Never use an abrasive cleaner or tools that could scratch the painted surface and cause damage to its appearance.
Andrew Saladino
Andrew Saladino is the Co-Founder of Kitchen Cabinet Kings and has helped more than 10,000 customers design kitchens that are both stylish and built to last. Recognized by the NKBA for his expertise in kitchen design, he believes the secret to a successful remodel comes down to planning, patience—and plenty of caffeine.
![See your dream kitchen in 3D [GET YOUR FREE DESIGN]](https://cdn.kitchencabinetkings.com/blog/wp-content/uploads/see-your-dream-kitchen-in-3d.webp)
![Contractor Discount Program: Offering contractors and builders special volume discounts on all applicable orders [LEARN MORE]](https://cdn.kitchencabinetkings.com/blog/wp-content/uploads/contractor-discount-program.webp)
![Explore our photo gallery [GET INSPIRED]](https://cdn.kitchencabinetkings.com/blog/wp-content/uploads/explore-our-photo-gallery.webp)
![What everyone is saying about KCK [READ REVIEWS]](https://cdn.kitchencabinetkings.com/blog/wp-content/uploads/what-everyone-is-saying-about-kck.webp)
![Get a cabinet sample [SHOP SAMPLES]](https://cdn.kitchencabinetkings.com/blog/wp-content/uploads/get-a-cabinet-sample.webp)
![Pay over time, on your terms with Affirm [LEARN MORE]](https://cdn.kitchencabinetkings.com/blog/wp-content/uploads/pay-over-time-on-your-terms-with-affirm.webp)


