Kitchen
How to Install Soft Close Hinges on Kitchen Cabinets (DIY Guide + Tips)
by Andrew Saladino
April 30, 2025
Do you hear it? That loud, sharp bang of your cabinet doors slamming shut? After a long day, it’s the last thing you’d want to echo through your home.
Here’s some good news: you can silence the chaos with a soft close cabinet conversion. No fancy contractors or expensive remodels are required.
All you need are a few tools, a little know-how, and the willingness to take on a DIY cabinet hinge upgrade. Let’s get your cabinets the glow-up they deserve with this guide on how to install soft close hinges on your kitchen cabinets.
What Are the Benefits of a Soft Close Cabinet Conversion?
Soft-close hinges sound fancy, but they’re really just clever. These hinges use a hydraulic mechanism to slow the cabinet door’s movement as it closes, ensuring it shuts gently and silently every time.
What’s the big deal? For starters, no more cabinet-slamming symphonies during your midnight snack runs. These hinges help protect your cabinet doors by reducing impact over time, which means they’ll last longer. Plus, they’re just easier on the ears—and your sanity.
Still not sold? They add value to your kitchen. Buyers will always appreciate little upgrades like soft-close hinges when it’s time to sell your home. Basically, they’re a small investment with solid returns, like installing brand-new cabinets without the cost.
What Are the Soft Close Hinge Types?
Before you break out the DIY toolbox, take a moment to choose the right hinge for the job. There are three main soft close hinge types to consider:
Overlay Hinges
Overlay hinges sit on top of the cabinet frame, so a portion of them remains visible when the door is closed. Simple and intuitive, these are a breeze to install and perfect for most modern cabinets.
Half Overlay Hinges
Half overlay hinges are a good choice if two cabinet doors share the same partition. You’ll still enjoy the magic of soft-closing, and they’re just as easy to install as their full-overlay cousins.
Inset Hinges
With inset hinges, the cabinet door sits flush with the frame for a seamless, minimalist look. While they might be less common, they’re ideal for clean, modern designs with a touch of sleek sophistication. They can be a little tricky, but hey, you’re here for a challenge, right?
Step-by-Step Guide: How to Install Soft Close Hinges on Cabinets
Now that you’ve identified your cabinet type and picked out the right hinges, it’s time to roll up your sleeves and get started.
Step 1: Remove the Cabinet Doors

Start by removing the cabinet doors from their frames. If you can, recruit a helper—some cabinet doors are surprisingly heavy. Use a power drill or a trusty old screwdriver to unscrew the existing hinges.
To keep everything organized, place the screws in a bowl or sandwich bag for safekeeping. Working door by door will also help you avoid getting mixed up when it’s time to reinstall.
Step 2: Detach the Old Hinges
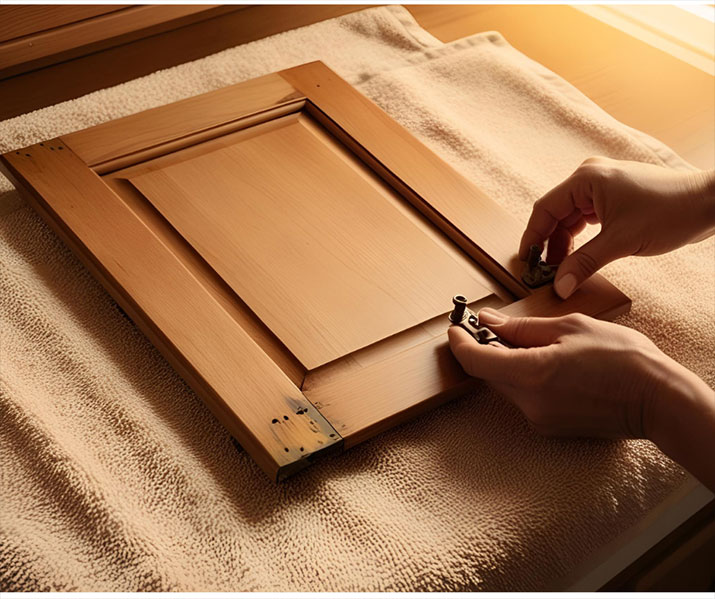
Lay the door flat on a non-scratch surface (a soft towel works great) and unscrew the old hinges. If the screws aren’t stripped, you can reuse them. But if they’re looking worse for wear, it’s best to use the hardware that comes with your new hinges.
For a clean finish, fill any stripped or mismatched screw holes with wood filler. This will give you a smooth surface to work with when it’s time to drill new holes.
Step 3: Align the New Hinges
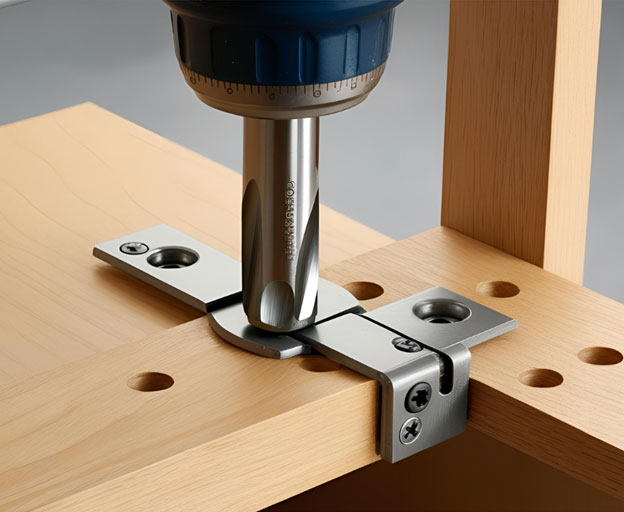
Soft-close hinges are great, but only if they’re aligned properly. Some hinges might line up perfectly with the old holes—lucky you! If not, you’ll need to drill new ones.
Use a self-centering drill bit to create neat, precise holes. A combination square can help you measure and align the hinges properly. Draw guide marks with a pencil before you drill to avoid mistakes.
Step 4: Install the Soft-Close Hinges
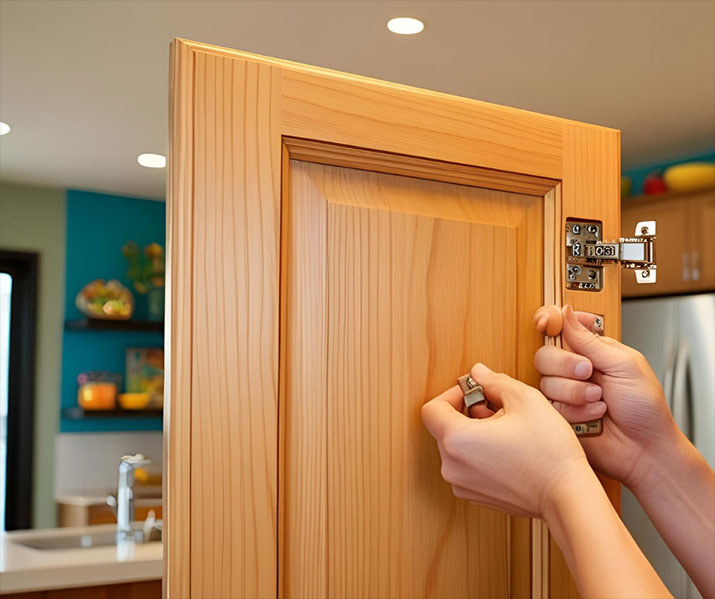
Attach the hinges to the door first. If you don’t have an extra set of hands to hold them steady, a small piece of painter’s tape can hold the hinges in place temporarily. Leave the screws slightly loose so you can adjust the alignment later.
Once the hinges are on, carefully rehang the door onto the cabinet frame, following the manufacturer’s instructions for attaching hinges to the frame. Line everything up and tighten the screws once you’re sure the door is correctly positioned.
Step 5: Make Adjustments
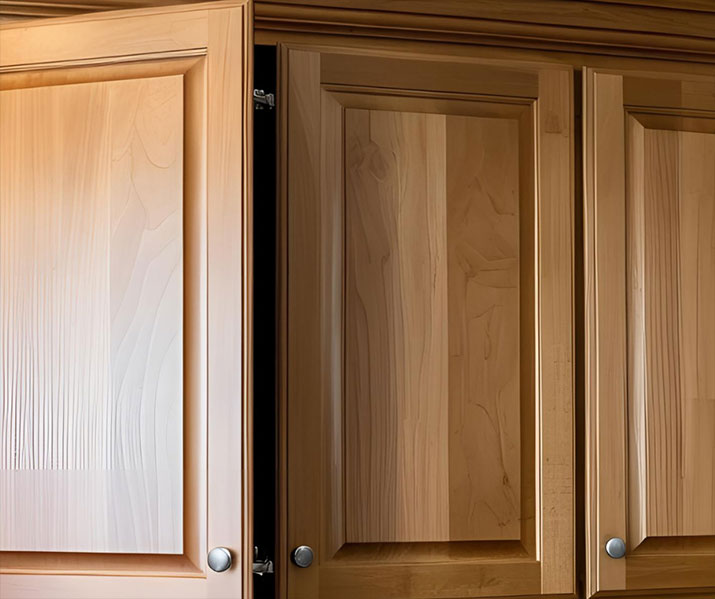
You’re almost there, but this step is key. Check the gaps between your cabinet doors and make sure everything is sitting flush. Most soft-close hinges have adjustment screws for fine-tuning alignment. If the door is off-center or doesn’t close smoothly, small tweaks should do the trick. For larger issues, you may need to remount the hinges.
Take your time here—getting the alignment right ensures the doors operate perfectly and adds to the finished look.
Cabinet Door Installation Tips
Feel like you’re fighting with gravity while holding a cabinet door in one hand and a screwdriver in the other?
Try this hack: Use a stack of books or a small stool to prop the door into place while you install hinges. This makes the process a two-handed affair and saves you from losing battles to precariously balanced doors.
Also, if the hinge screws start feeling loose after multiple adjustments, take a breather. Grab a dab of wood filler and apply it in the loose hole. Once it hardens, you can drive the screw in again for a nice, tight fit.
If you’re handy with tools and aren’t scared of a little trial and error, this kind of installation process is perfect for a DIY project. With some patience and a few basic tools, you can tackle it in an afternoon—and save a few bucks in the process.
However, if aligning cabinet doors sounds like torture (or you’d rather binge-watch your favorite show), a professional might be worth it. Pros can knock this out efficiently and make sure every detail is just right. Expect to pay between $100 and $300 for a professional installation, plus the cost of hinges.
Consider a DIY Cabinet Hinge Upgrade Today
Upgrading your cabinets with soft-close hinges is one of the simplest ways to add a touch of luxury to your space. It’s an affordable project, totally DIY-friendly, and makes a noticeable difference in your day-to-day life.
Whether you tackle this project on your own or call in a pro, it’s a worthwhile investment—and your ears (and cabinet doors) will thank you for it.
Frequently Asked Questions
Can you put soft close hinges on existing cabinets?
Yes! Soft-close hinges are designed to retrofit most standard cabinets. Just figure out your cabinet type and door style to choose the right hinges.
What are the disadvantages of soft close hinges?
There aren’t many. The hinges can be pricier than standard ones, and they require a little more effort to install. But the benefits—quiet cabinets and less wear and tear—more than make up for it.
How can I update my kitchen cabinet doors without replacing them?
Aside from soft-close hinges, consider swapping out cabinet hardware (knobs and pulls), adding peel-and-stick lighting, or using cabinet paint kits to refresh tired finishes.
What is an alternative to soft close hinges?
If soft-close hinges don’t feel like the right fit, you could try soft-close dampers, which attach to the frame or door and achieve a similar effect.
Andrew Saladino
Andrew Saladino is the Co-Founder of Kitchen Cabinet Kings and has spent more than a decade helping over 110,000 homeowners make more confident kitchen remodeling decisions. Recognized by the NKBA for his expertise in kitchen design, he writes about cabinet styles, design trends, remodeling costs, lead times, and the details homeowners often don't think about until it's too late.


