How To Install a Bathroom Vanity and Sink
By: Andrew Saladino |  9 min
9 min
Last Updated: December 12th, 2023
Whether you're a seasoned DIY enthusiast or embarking on your first bathroom remodeling project, upgrading your vanity can completely transform an outdated, bleak bathroom into a spa-like oasis. This step-by-step guide will walk you through how to install a bathroom vanity, from pre-installation considerations to the finishing touches, to ensure your bathroom upgrade is a success.
Table of Contents
1. Gather Your Tools and Materials
Installing or replacing your bathroom vanity and sink is a fairly straightforward process, but it does require some specific tools and materials you'll likely need to purchase from your local hardware store. Here's a breakdown of what you'll need to get started:
Tools:
- Adjustable wrench: essential for tightening nuts and bolts during plumbing connections
- Screwdriver set: both Phillips and flathead screwdrivers will come in handy for various tasks
- Utility knife: handy for cutting through any caulk or adhesive that may be sealing the vanity to the wall or floor
- Pry bar: useful for gently prying the old vanity away from the wall or floor
- Measuring tape: precise measurements are crucial for ensuring a snug fit in your bathroom
- Level: to guarantee that your vanity is perfectly horizontal and vertically aligned
- Drill and hole saw: for making holes in the vanity or wall to accommodate plumbing and fixtures
- Pencil and marking tools: for marking the positions for mounting and cutting
- Caulk gun: necessary for applying caulk for sealing gaps around the sink and vanity
- Pipe wrench: useful for securing and connecting plumbing components
- Safety gear: safety glasses and work gloves to protect yourself during the installation process
Materials:
- Bathroom vanity: your chosen vanity, complete with all necessary components like doors, drawers, and hardware
- Sink and faucet: ensure you have the sink and faucet ready for installation
- Water supply lines: these flexible hoses will connect your new faucet to the water supply
- Drain pipe and P-trap: to ensure proper drainage
- Shims: handy for leveling the vanity and ensuring it's stable
- Mounting screws and anchors: necessary for securing the vanity to the wall or floor
- Plumber's tape and putty: used to seal plumbing connections and prevent leaks
- Caulk: for a watertight seal around the sink and vanity edges
- Bucket and towels: for catching water and for cleanup during the plumbing process
MATERIALS CHECKLIST
2. Prepare Your Workspace
You'll need:
- Drop clothes or old towels
- Masking tape or painter’s tape
- Access to water and power supplies
Before you begin tearing out your old vanity, you need to create a safe and efficient workspace. To prepare your bathroom for the installation process:
- Clear the area around where you plan to install the vanity. Remove any obstacles like rugs, toilet paper dispensers, or other items that might get in your way.
- Protect surrounding surfaces, like the bathroom floor or toilet, with drop clothes or old towels to prevent damage from tools or materials that could drop or spill during installation. You may also want to use masking tape or painter's tape to protect adjacent walls or tiles from scratches and marks.
- Turn off the power supply and shut off the water source to the bathroom if your installation involves electrical connections or plumbing adjustments. The last thing you want is an unexpected flood or an encounter with live wires.
3. Remove Your Old Vanity
You'll need:
- Safety glasses and gloves
- Adjustable wrench
- Screwdriver sets
- Utility knife
- Pry bar
- Bucket and towels
Once your workspace is ready and the water supply is shut off, you can go ahead and remove your old vanity. Start by disconnecting the water supply lines from the faucet and the drain pipe beneath the sink. Have your bucket and towels ready to catch any residual water.
Next, remove the countertop by unscrewing any clips or brackets attaching it to the vanity. Depending on the installation method, you may also need to detach the sink from the vanity base. If you plan on recycling or reselling your old sink and countertop, be careful to avoid any damage.
After the sink is removed, focus on the vanity base. Typically, it's secured to the wall with screws or anchors. Locate and remove these fasteners, then carefully detach the vanity from the wall. If the vanity has been caulked to the wall, use a utility knife to cut through the caulk seal. Finally, if there's a backsplash attached, remove it as well.
Pro tip:
If you plan on painting your bathroom, installing a new backsplash, or taking on an entire bathroom remodel, now’s the time to do so. You’ll have much more room to work without maneuvering around a bulky vanity.
4. Assemble Your New Vanity
You'll need:
- Safety glasses and gloves
- Adjustable wrench
- Measuring tape
- Level
- Drill and hole saw
- Pencil and marking tools
- Caulk and caulk gun
Now comes the fun part: assembling your brand-new vanity. Begin by carefully unpacking all the new components of your vanity and laying them out on a clean, flat surface, taking care to check for any shipping damage or missing parts. Read through the manufacturer's instructions for specific guidance on assembling your particular vanity model.
Start by attaching the knobs, pulls, brackets, and any other necessary cabinet hardware to the cabinet drawers and doors. Again, follow instructions and check that everything is properly secured.
Once the hardware is in place, you can begin to assemble the main vanity structure. Use the provided screws, bolts, or dowels, and double-check that all components are aligned correctly. Take your time during this step to ensure a sturdy and well-constructed foundation for your vanity.
Lastly, inspect the assembled vanity for any wobbling or instability. If needed, use shims to level it so it sits securely and evenly on the floor or against the wall.


5. Install Your Bathroom Sink
You'll need:
- Safety glasses and gloves
- Plumber's putty or caulk
- Mounting hardware
- Plumber's tape
Whether you're installing a classic white porcelain bowl sink or a trendy vessel bathroom sink, it's essential to create a watertight connection to prevent leaks. Begin by carefully positioning the sink in its designated space on top of the vanity. Make sure it's centered and aligned correctly with the vanity and the plumbing openings. Most sinks come with a template for precise positioning; use it if provided.
Next, apply a thin bead of plumber's putty or silicone caulk around the edge of the sink cutout. This sealant will help create a watertight barrier between the sink and the vanity, preventing water from seeping underneath. Lower the sink into the cutout, pressing it firmly into the putty or caulk. Apply gentle, even pressure for a proper seal. If your sink has mounting clips or brackets, secure them to the underside of the sink and attach them to the vanity per the manufacturer's instructions.
Lastly, wipe away any excess putty or caulk that may have squeezed out around the sink's edge to provide a clean finish and a tight seal. Allow the sealant to cure according to the manufacturer's recommendations before moving on to the next step.
6. Connect the Plumbing
You'll need:
- Safety glasses and gloves
- Adjustable wrench
- Plumber's tape
- Water supply lines
- Drain assembly
- P-trap
- Plumber's putty or caulk
- Plastic or metal drain washers and nuts (if not provided)
- Bucket and towels
With your sink properly installed, it's time to rework the plumbing so you can actually use it. You'll need to install a few key components when connecting your vanity plumbing:
- Water supply lines: Start by connecting the water supply lines to the faucet. Use flexible water supply hoses that are the appropriate length and compatible with your faucet. These hoses typically have threaded connectors that screw onto the faucet's valve stems. Tighten them securely, but be cautious not to overtighten, as this can damage the connections.
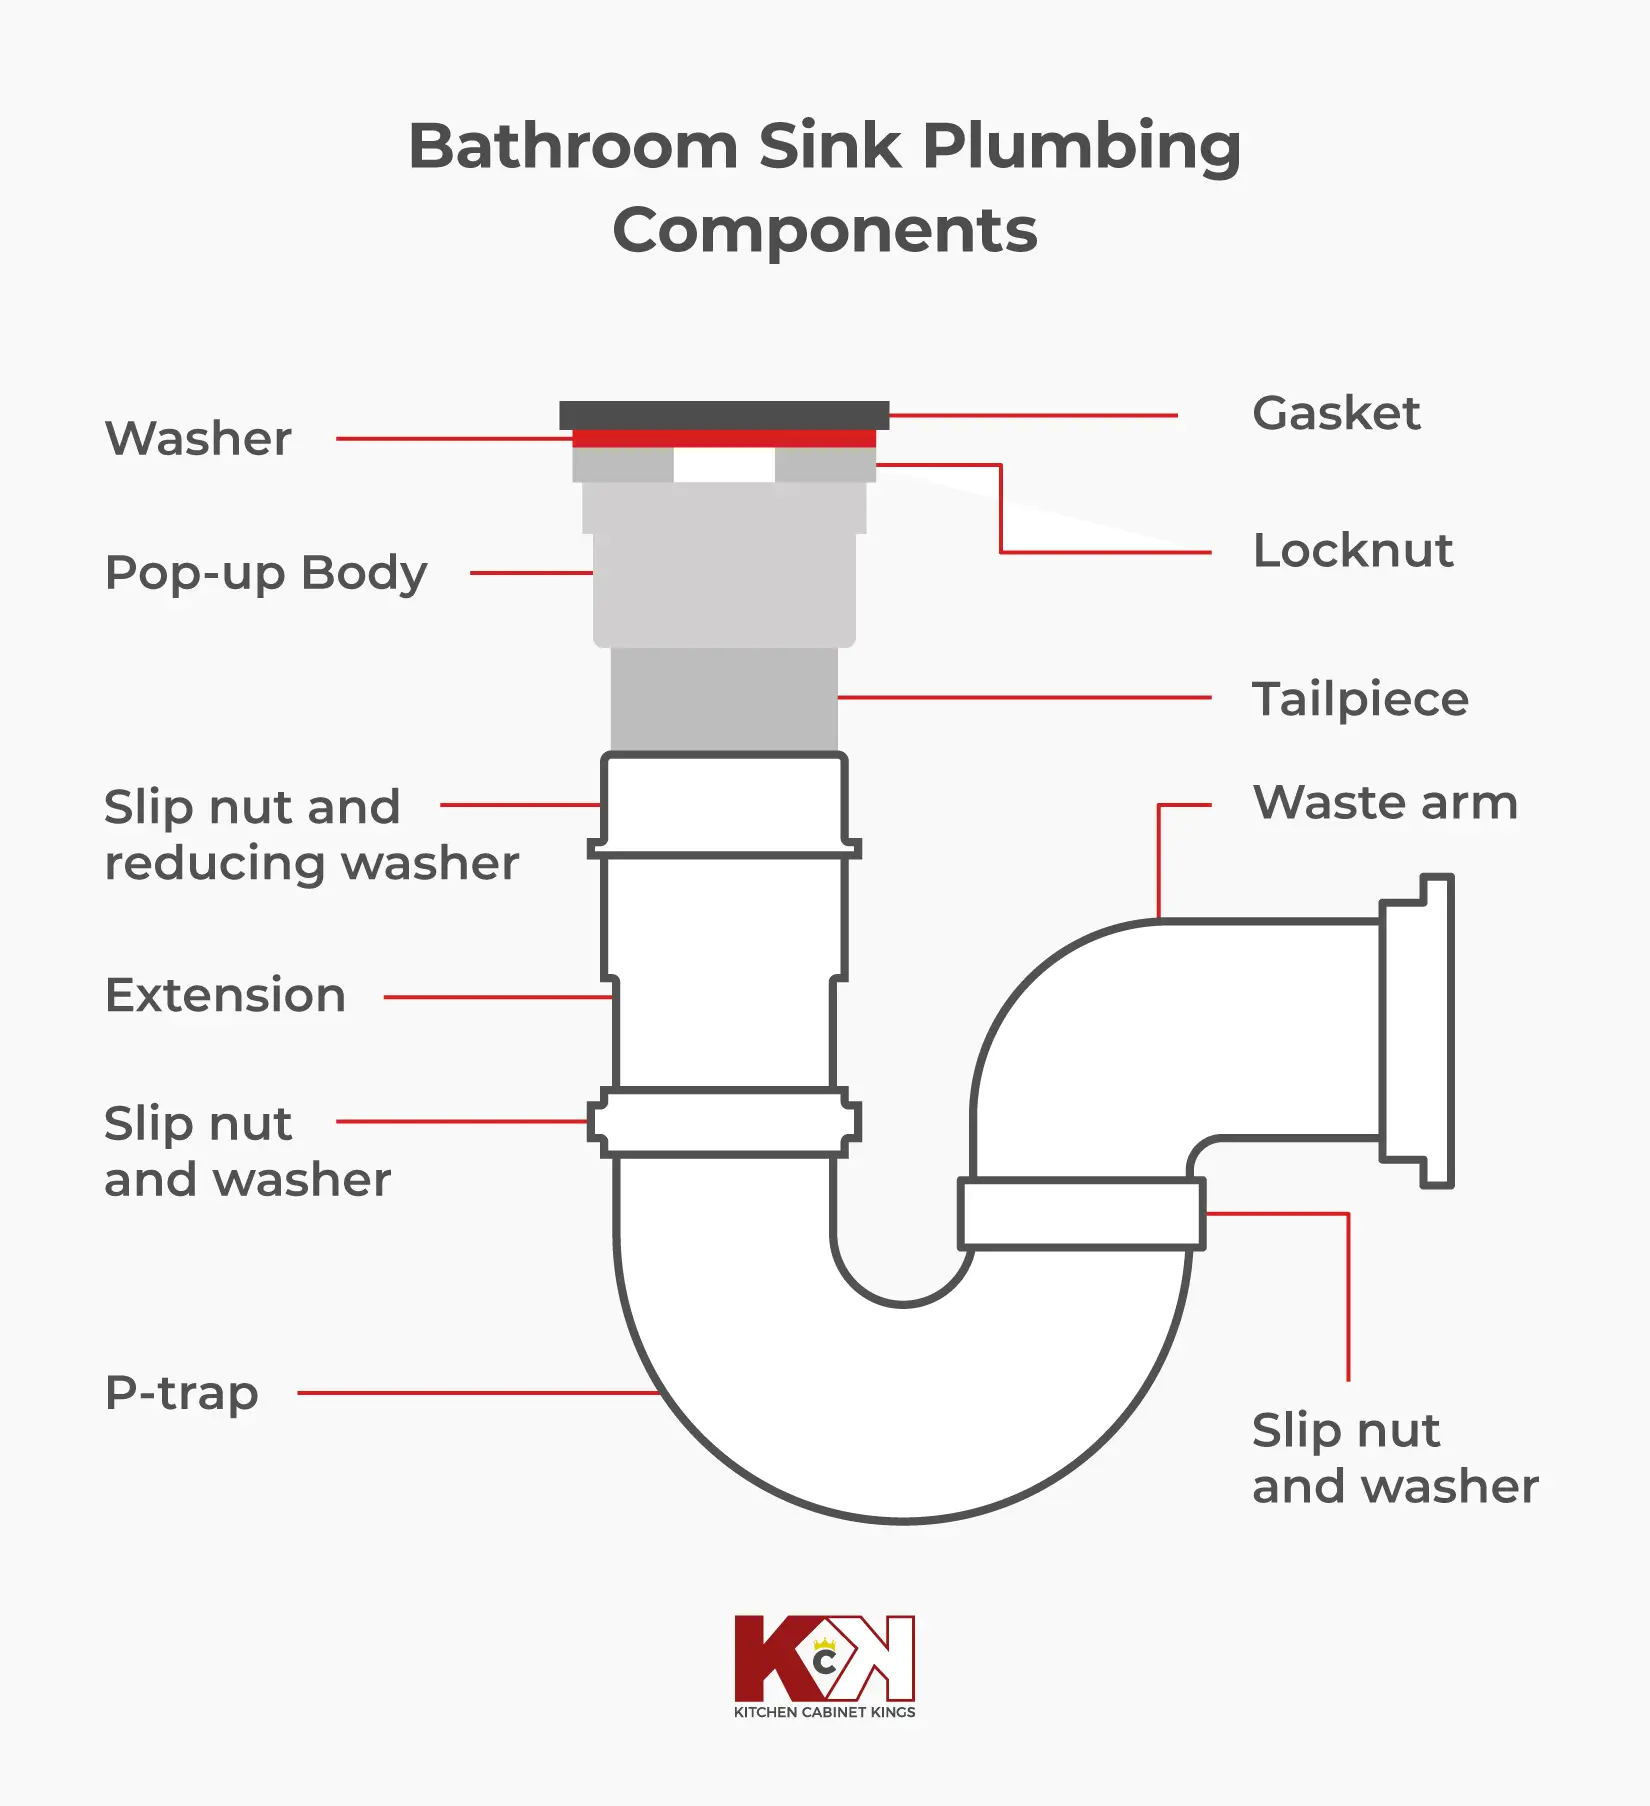
- Drain assembly: The drain assembly usually consists of a drain flange, gasket, pop-up, and locknut. Install the drain assembly by inserting it into the drain hole in the sink basin. Ensure that the gasket is properly positioned to create a watertight seal. Tighten the locknut from below the sink to secure the drain assembly in place.
- P-trap connection: The P-trap is a curved pipe that helps prevent sewer gases from entering your bathroom. Connect the P-trap to the drain pipe coming from the wall. Use slipnuts and washers to secure the P-trap to both the drain pipe and the tailpiece of the sink's drain assembly.
Before turning on the water supply, double-check all connections are tight and aligned correctly. Slowly turn on the water supply valves and observe for any leaks. Keep a bucket and towels on hand to catch any potential drips during this initial test. If you notice any leaks, shut off the water supply immediately and adjust the connections.
7. Secure Your Vanity
You'll need:
- Safety glasses and gloves
- Mounting brackets or screws
- Shims
- Level
- Screwdriver sets
- Wall anchors (if wall-mounted)
- Fasteners (if freestanding)
- Pencil and marking tools
Securing your vanity to the wall or floor is a critical step in the installation process, but proper anchoring techniques will depend on the style of vanity you've chosen. Here's how to securely fasten both wall-mounted and freestanding bathroom vanities:
- Wall-mounted vanities: Wall studs will provide the necessary support for your wall-mounted vanity. Locate the wall studs using a stud finder and mark the stud locations on the wall. Then, using the manufacturer's recommended hardware (usually screws or brackets), attach the vanity to the wall through the back panel or mounting points. Make sure the vanity is level and the fasteners are tight but not overtightened to avoid damaging the vanity or wall.
- Freestanding vanities: For freestanding vanities, you'll need to secure them to the floor. Most vanities come with leveling feet or adjustable legs, which allow you to level the vanity on uneven surfaces. Use shims if needed to achieve perfect levelness. Once the vanity is level, secure it to the floor using the appropriate hardware, such as screws or anchors. Be sure to follow the manufacturer's instructions for your specific vanity model.
In some cases, vanities may require additional support for stability, especially if they are large or have heavy countertops. Consider using angle brackets or L-brackets to reinforce the vanity's attachment to the wall or floor and prevent any wobbling or shifting over time.
8. Apply the Finishing Touches
You'll need:
- Safety glasses and gloves
- Caulk
- Adjustable wrench
- Plumber's tape
- Sink faucet
- Accessories and decor
Once your new bathroom cabinets are secure and the plumbing is functioning properly, you can focus on adding the finishing touches to your bathroom vanity installation, like:
- Caulking: Use a high-quality bathroom caulk to seal the gap between the sink rim and the countertop, as well as the area where the vanity meets the wall. This not only provides a neat and finished appearance but also prevents water from seeping into crevices, reducing the risk of mold and water damage.
- Faucet and hardware: If you haven't already installed the bathroom faucet and any additional hardware like handles or knobs, now is the time to do so. Follow the manufacturer's instructions for your specific faucet model and ensure a snug and secure fit. Test the faucet for proper operation and check for any leaks.
- Accessories and decor: Add any accessories or decorative elements that enhance the functionality and style of your bathroom, like a framed mirror, a vanity light fixture, or decorative towels and soap dispensers.
Post-Installation Inspection

Before declaring your installation complete, perform a final inspection. Double-check all connections, seals, and hardware to ensure everything is in place and functioning as expected.
- Check for any signs of leaks around plumbing connections. Inspect the area beneath the sink, the P-trap, and the faucet connections for drips or moisture. If you notice any leaks, promptly tighten the connections or replace faulty components to prevent water damage.
- Test the functionality of the sink and faucet. Turn on the water supply and run both hot and cold water through the faucet. Check for proper water flow and drainage. Ensure that the drain stopper operates smoothly and seals tightly when closed.
- Examine the vanity for stability and levelness. Gently press on different areas to check for wobbling or instability. If necessary, use shims to level the vanity and ensure it's securely anchored to the wall or floor.
- Inspect the caulking and sealing around the sink and the area where the vanity meets the wall. Ensure these seals are intact, free of gaps, and provide a watertight barrier.
Pre-Installation Considerations
Before diving into the actual installation of your bathroom vanity, it's important to carefully consider several pre-installation factors to ensure a successful and stress-free remodeling project.
Measurements and Layout
Before you purchase a new vanity, make sure to accurately measure the available space in your bathroom. Take note of the dimensions, including the width, height, and depth of the area where the vanity will be placed. This information will help you select the right size vanity for your bathroom.
You should also consider the layout of your bathroom and the location of existing plumbing connections, electrical outlets, and fixtures. Ensure that the new bathroom vanity's size won't obstruct or interfere with any of these elements.
Existing Plumbing and Electrical
If you're replacing an old vanity, examine the existing plumbing and electrical connections to determine if they need any updates or modifications to accommodate the new vanity and sink. For your safety, ensure that your plumbing and electrical work complies with local building codes and regulations. If you're uncertain about these aspects, consult a professional plumber or electrician to make any necessary adjustments before proceeding with the installation.
Vanity Style and Features
Carefully select a vanity that offers the style you want with the functionality you need. Consider factors like the bathroom cabinets' design, color, and finish to ensure they complement your overall bathroom decor. Additionally, think about your desired features, such as the number of sinks, storage capacity, and countertop material. Customization options can make a significant difference in how well the vanity suits your preferences and needs.
Looking for the perfect bathroom vanity to complement your dream bathroom remodel? We offer the highest quality pre-assembled and RTA bathroom cabinets so you can get the look you want at a price you can afford.
How To Install a Bathroom Vanity FAQs
Check out these commonly asked questions about installing a bathroom vanity below.
How do you fill a gap between a bathroom vanity and a wall?
You can use silicone caulk to fill a gap between your bathroom vanity and the wall. Start by cleaning the area and removing any old caulk or debris. Then apply a bead of silicone caulk along the gap, ensuring it's smooth and even. Use a caulk smoothing tool or your finger to create a neat finish, and allow it to dry according to the manufacturer's instructions. This prevents moisture from seeping in and provides a clean and finished look.
How long does it take to install a bathroom vanity?
The time it takes to install a bathroom vanity varies depending on factors like the complexity of the installation, the type of vanity (wall-mounted or freestanding), the plumbing and electrical work required, and the installer's experience.
On average, a professional installer may take around two to four hours to complete the installation. However, a DIY installation can potentially span a day or more, especially if you're less experienced or encounter unexpected issues during the installation process.
Do you put baseboard behind a bathroom vanity?
In most cases, you should not apply baseboard behind the vanity. Skipping the baseboard ensures your bathroom countertop sits flush against the wall for a snug fit and clean appearance.
Proper bathroom vanity installation can make or break the functionality of the space. If you have any doubts about installing your vanity yourself, don't hesitate to reach out to a professional contractor for help.