32 Kitchen Science Experiments To Try At Home + Printables
By: Andrew Saladino |  12 min
Learning about science hands-on is one of the best ways to get your kids excited about it! Whether you homeschool your children, they're bored on a weekend, or home for the holidays—entertain them with a few fun experiments that will expand their knowledge of science.
Your kitchen is a great place to conduct a few safe and fun experiments with your kiddos. Simple ingredients that you already have in your kitchen cabinets, like vinegar, baking soda, food coloring, and sugar, allow you to recreate dozens of different experiments at home.
We compiled some of the best science experiments to try in your kitchen and created fun printables so your little scientists can have a better understanding of how the world around them works.
Note: While all of these experiments are kid-friendly, make sure to supervise your little ones and help them out. We've added age suggestions to each experiment to help give you a better estimate of which projects are safe to do with your kids.
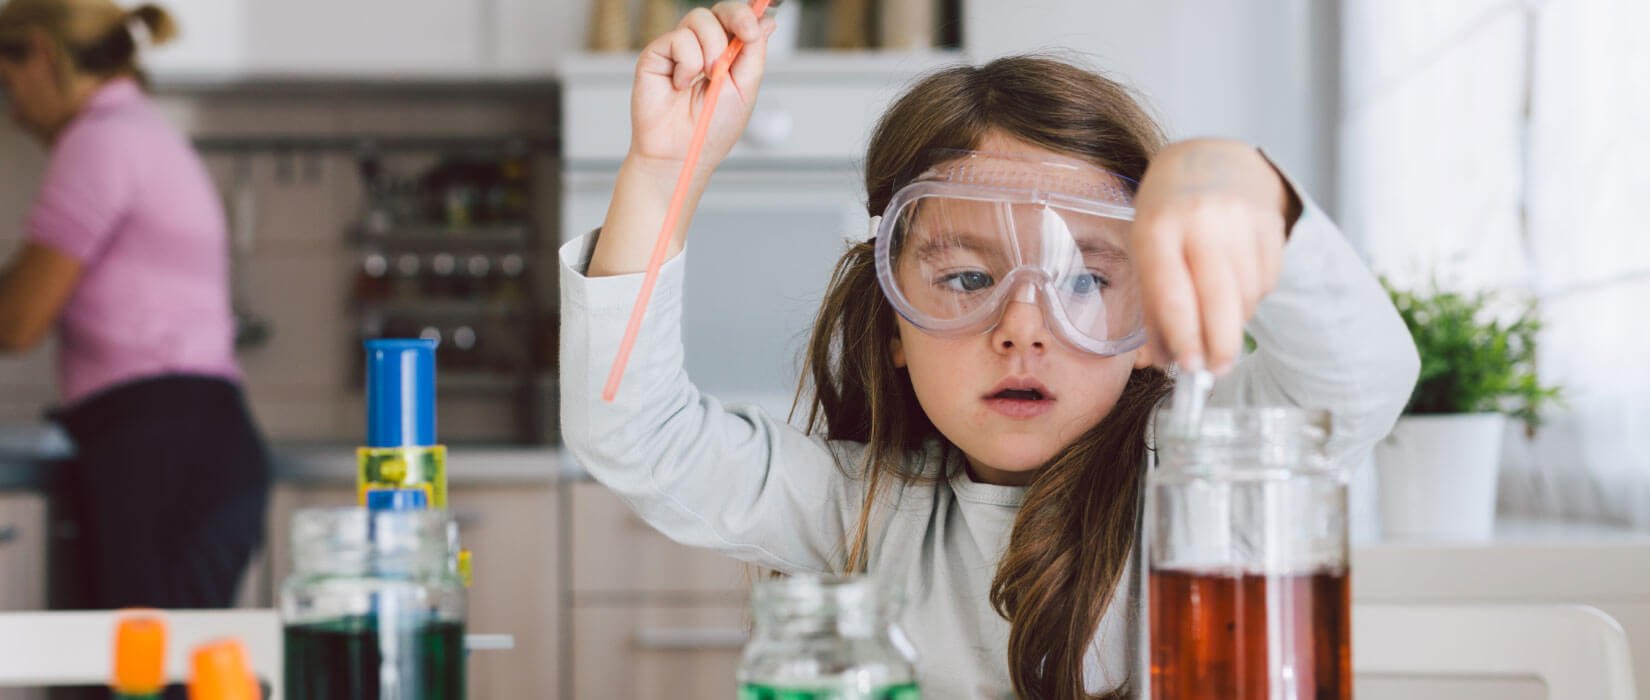
Colorful Experiments
If your kids love rainbows and all things colorful, they will be thrilled to try these experiments. Making science accessible, fun, and easy to understand can be difficult, but with a little bit of color, you'll get even the shyest kid out of their shell!
1. Rainbow In A Cup
Ages: 5–12 years
Estimated Time: 15 minutes
What You'll Need:
- Food coloring (red, orange, blue, and green)
- 10 Tbsp sugar
- 5 clear plastic cups (or glasses)
- Hot water
How It's Done:
- Line up your five cups.
- We'll add the sugar first. Add 1 Tbsp of sugar to the first cup, 2 to the second, 3 to the third, and 4 to the fourth. Leave the last one empty.
- Now add 3 Tbsp of hot water to each cup that has sugar in it. Stir the solution until the sugar is dissolved. If you have to, you can reheat the water in the microwave or add 1 more Tbsp of water to each cup so the sugar can fully dissolve.
- It's not a rainbow without some color! Add 2-3 drops of food coloring to each glass. Use red for the first cup, yellow for the second, green for the third, and blue for the fourth.
- Now fill the empty cup to about a quarter with the blue solution.
- Slowly pour the green solution over the back of a spoon above the blue liquid until the cup is half full.
- Then, add the yellow layer using a fresh spoon until the cup is filled to three quarters.
- Finally, add the red liquid to fill the cup and marvel at your rainbow in a cup (or glass)!
How It Works:
The more sugar you add to the water, the higher the density of the liquid will be. A liquid with a lower density will sit on top of a layer with a higher density, which is why you can stack the different colored liquids to create a rainbow in a cup.
Ask your kid to mix the solution and see what happens. The colors will not separate again because you used the same chemical (sugar or sucrose) to mix the different concentrations.
2. DIY Lava Lamp
Ages: 5–12 years
Estimated Time: 15–20 minutes
What You'll Need:
- A large clear vase or wide bottle
- Food coloring of choice
- Vegetable oil
- Water
- 1 sodium bicarbonate tablet
How It's Done:
- Fill your vase or bottle up to 3/4 full with the oil.
- Fill the rest up with water, but leave about 3 inches at the top to avoid a mess.
- Wait to see the water fall through the vegetable oil and watch the two liquids completely separate (if you're on a tighter schedule, pour the water in first).
- To make this experiment a bit more fun, add about 10 drops of food coloring and watch it fall through the oil, tinting the water at the bottom.
- Now it's time to party! Carefully drop the sodium bicarbonate tablet in the container and watch your lava lamp.
How It Works:
Water has a higher density than oil which allows the two liquids to separate completely. The sodium bicarbonate tablet reacts with the water and produces carbon dioxide gas bubbles that stick to the tinted water droplets. This gas and water combination is less dense than the vegetable oil above, so the bubbles rise to the top where the gas is released, and the water falls back to the bottom again.
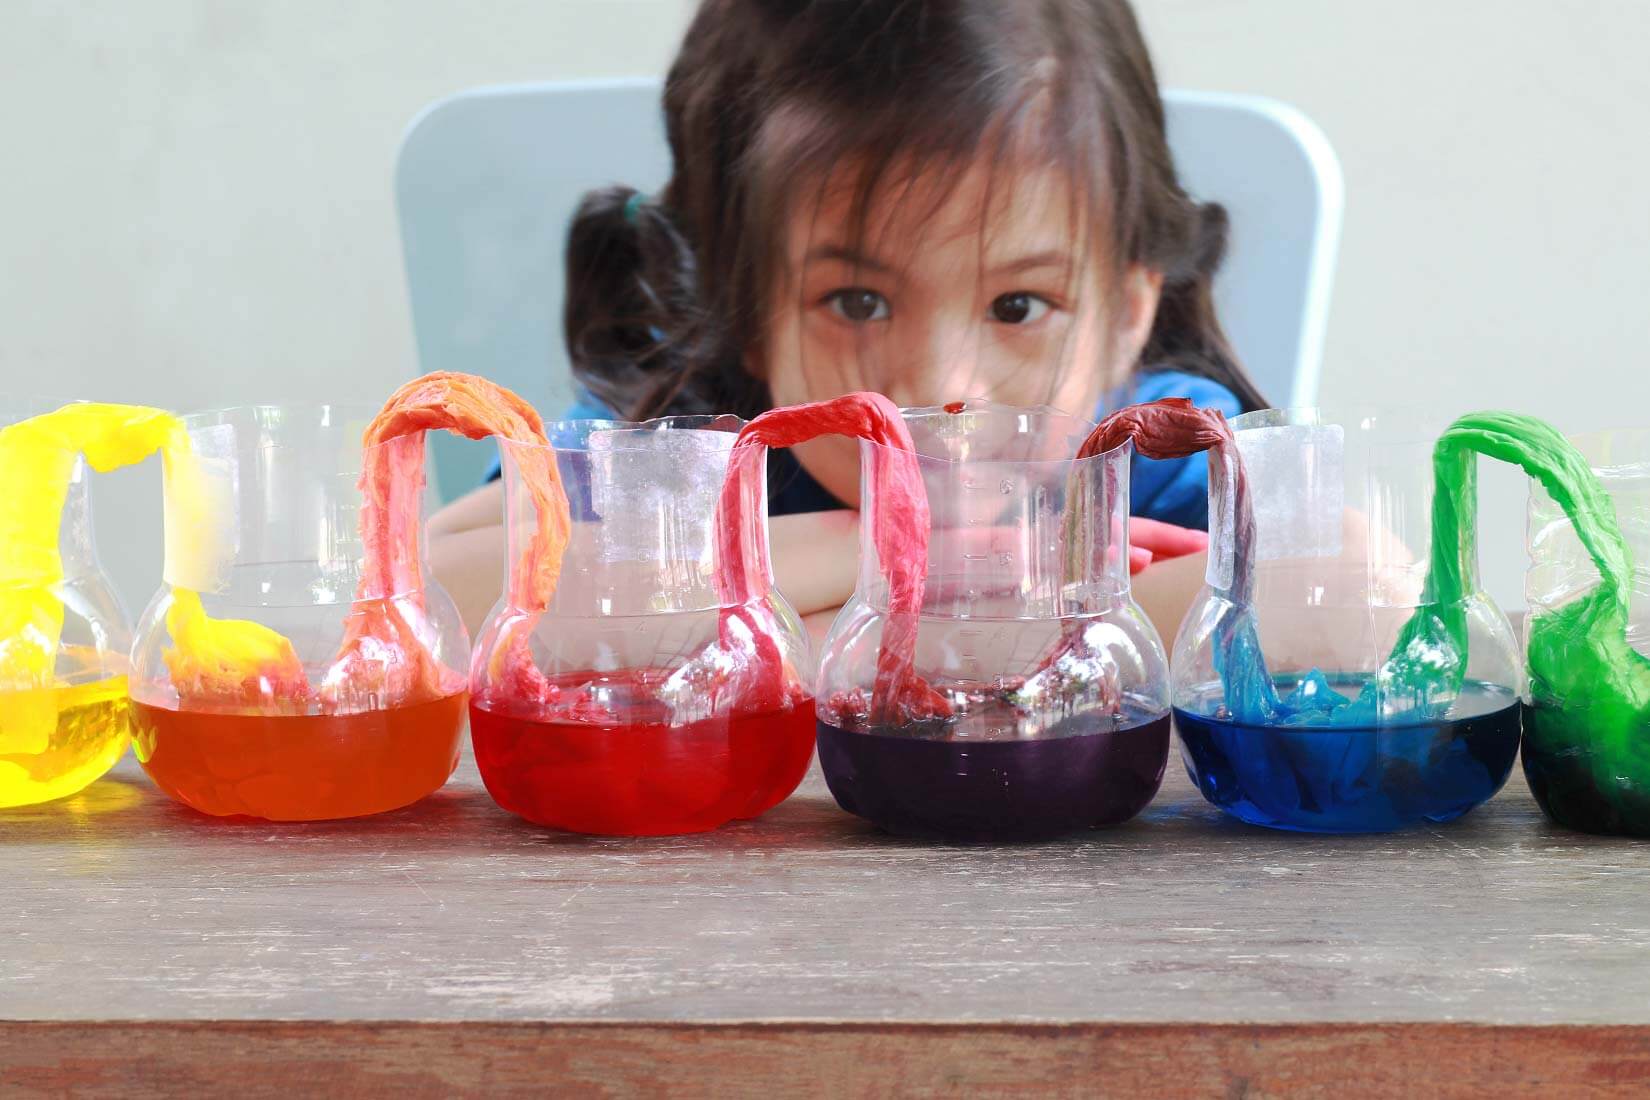
3. Walking Water
Ages: 6–10 years
Estimated Time: 20–30 minutes
What You'll Need:
- 7 jars or cups with wide openings
- Food coloring (red, yellow, and blue)
- 6 paper towels
How It's Done:
- Line up your 7 cups and fill every other one with water, about 3/4 full.
- Add a few drops of red food coloring to the first cup, yellow to the second, and blue to the last.
- Fold your paper towels in half twice so you have long and thin strips. The thinner your paper towels are, the faster this experiment will run.
- Now, fold the paper towels strips in half lengthwise and hold them up against your cups. Shorten them a bit with scissors if they stick out too far when sitting in the jars.
- Place each sheet so one side is in a full cup and the other side is in an empty cup.
- Watch as the magic unfolds and creates a rainbow in front of you.
How It Works:
Thanks to capillary action, the water can travel up the paper towel and into the other glass against gravity. The tiny gaps between the fibers in the paper towel pull the water through and into the glass next to it until all glasses are evenly filled.
If you use the three base colors in the right order, they'll mix and create a rainbow effect.
4. Storm In A Glass
Ages: 6–12 years
Estimated Time: 5–10 minutes
What You'll Need:
- A tall glass
- Shaving cream
- Blue food coloring
- Spoon and small bowl
- Water
How It's Done:
- Fill the glass half full with water.
- Fill the rest of the glass with a one inch layer of shaving cream and make sure there's at least one inch of space at the top of the glass so the experiment doesn't overflow.
- Fill the small bowl with about half a cup of water and mix it with enough food coloring to get a vibrant blue (about 8–12 drops).
- Use a spoon to slowly pour more and more of the blue liquid on top of the shaving cream and watch what happens.
- Eventually, the blue liquid will break through the "clouds" and create a storm in the glass!
How It Works:
The storm in a glass experiment is great to teach your kids about precipitation. Precipitation is any water that falls from the sky (rain, snow, drizzle, hail, etc.). The more moisture there is in the atmosphere, the more likely we are to see clouds form—since clouds are made out of billions of tiny water particles.
In this experiment, you can show kids that just a few drops of water will not push through the "cloud" of shaving cream, but once it reaches a point where it gets too heavy, it starts a storm.
In the real world, water alone isn't enough to start a storm. A cloud needs to get triggered by dust particles (like salt or sand), so it starts raining. Still, this little kitchen-friendly experiment can help kids grasp the concept of what happens above our heads when the heavens open up.
Water Experiments
Water has many interesting qualities and is a safe ingredient to experiment with in your kitchen. Plus, you'll always have it at hand! Try these science projects with your kids to teach them about phenomena like buoyancy, density, and surface tension.
5. Aluminum Foil Submarine
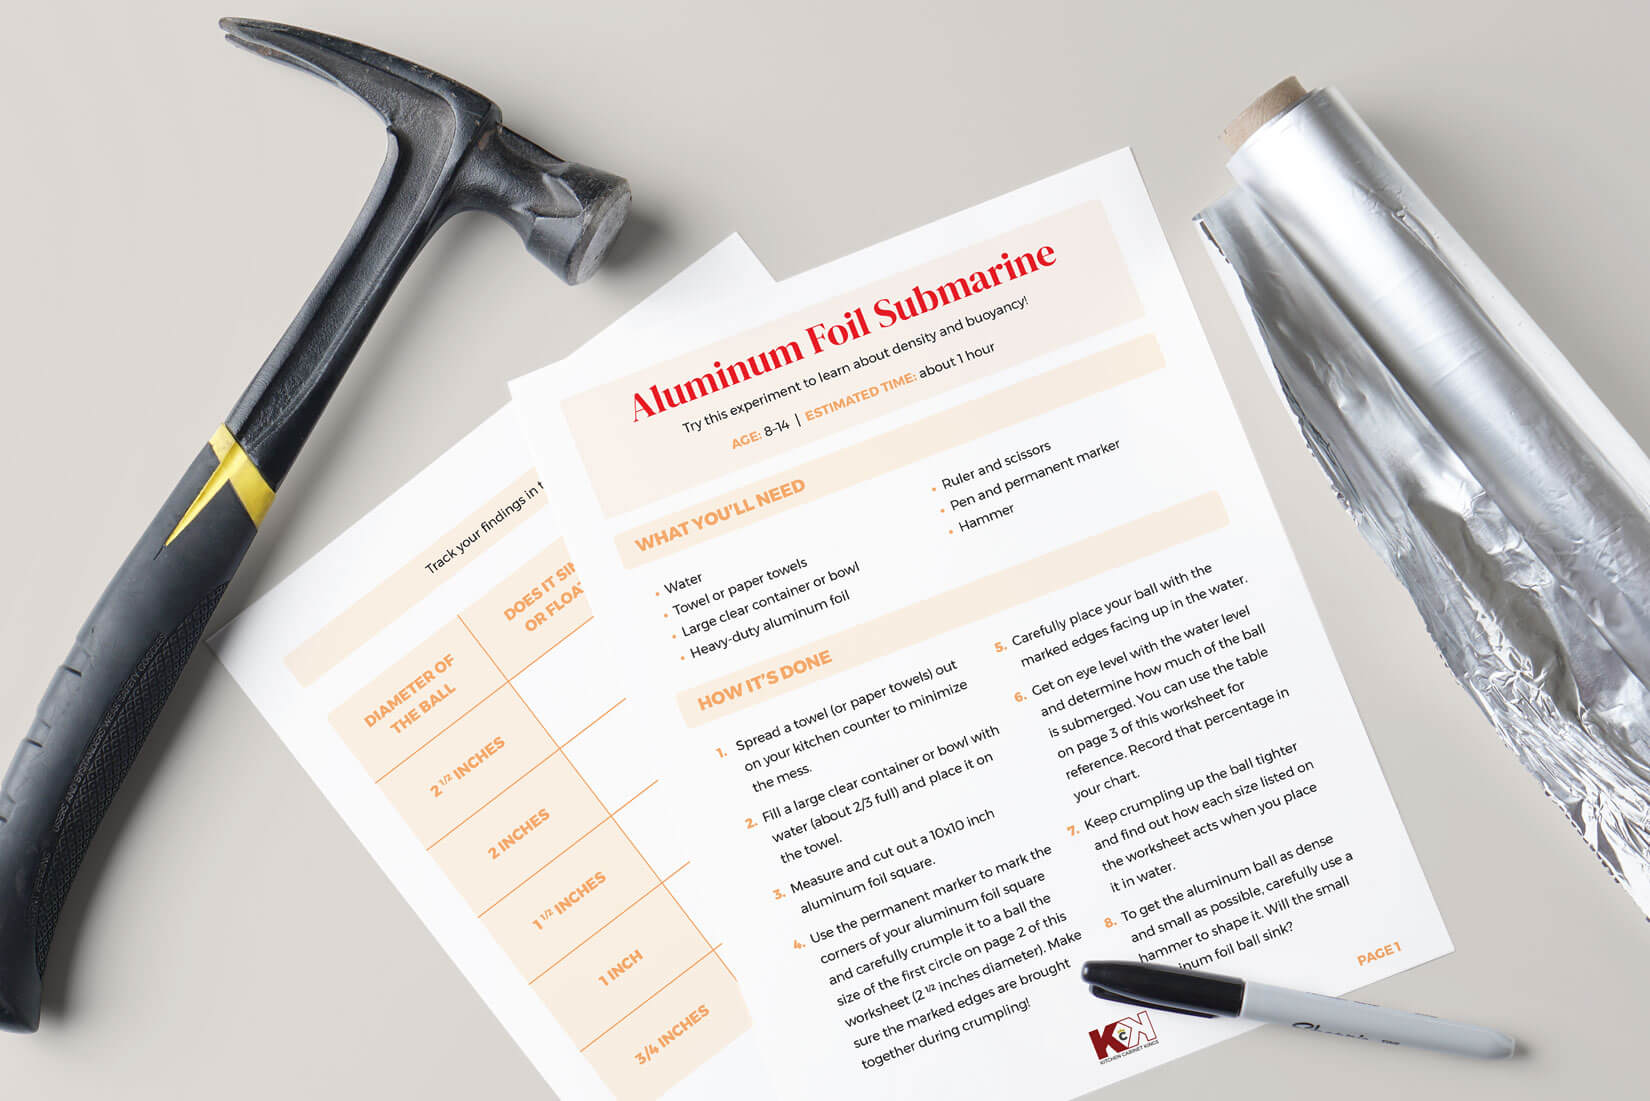
Ages: 8–14 years
Estimated Time: about 1 hour
What You'll Need:
- Water
- Towel or paper towels
- Large clear container or bowl
- Heavy-duty aluminum foil
- Ruler and scissors
- Pen and permanent marker
- Hammer
How It's Done:
- Spread a towel (or paper towels) out on your kitchen counter to minimize the mess.
- Fill a large clear container or bowl with water (about 2/3 full) and place it on the towel.
- Measure and cut out a 10x10 inch aluminum foil square.
- Print out the data table below so you can track your data.
- Use a permanent marker to color in the corners of your aluminum foil square and carefully crumple it to a ball the size of the first circle on the worksheet (2 1/2 inches diameter). When you crumple the aluminum foil into a ball, you'll want to bring the colored corners together first so the bottom of your ball doesn't have any holes.
- Carefully place your ball with the marked edges facing up in the bowl of water.
- Get eye level with the water and determine how much of the ball is submerged. You can use the table on page 3 of the worksheet for reference. Record that percentage in your chart.
- Keep crumpling up the ball tighter and find out how each size listed on the worksheet acts when you place it in water.
- To get the aluminum ball as dense and as small as possible, carefully use a hammer to shape it.
- Eventually, your ball should be dense enough to sink.
How It Works:
When you place an object in water, the water moves out of the way to make room for the object. Depending on the density compared to water and the object's buoyancy, it will either sink or float. Archimedes, a Greek mathematician who lived over 2,00 years ago, found this out when he sat down in his bathtub.
Back to our kitchen science experiment: The more you crush the aluminum ball, the more matter is packed into the same volume (higher density), making the ball less buoyant because there are no air pockets inside. If your kids are little scientists, have them do this experiment two or three times and then calculate the average percentage for each diameter.

6. Floating Ketchup
Ages: 5–10 years
Estimated Time: 5 minutes
What You'll Need:
- A clear plastic drinking bottle (1 liter)
- A ketchup packet (like they serve at restaurants)
- 3 Tbsp kosher salt
- Water
How It's Done:
- Remove any labels from the bottle and fill it with water, all the way to the top.
- Add 3 Tbsp of kosher salt and the ketchup packet to the bottle. Put the cap on and shake until the salt dissolves.
- Now, hold the bottle upright (cap closed) and press it. If you did everything right, the ketchup packet will sink to the bottom of the bottle until you release it again!
How It Works:
There is a little air bubble inside the ketchup packet which allows it to float in saltwater. When you squeeze the bottle, you put pressure on the ketchup packet which causes the air bubble to get smaller. This affects the density of the packet so it sinks to the bottom of the bottle. When you take your hands off the bottle, the packet will rise to the top again.
This experiment is also known as the cartesian diver and is great to demonstrate buoyancy (the floating ketchup packet) and density (the packet sinking to the bottom when exposed to pressure).
7. Pepper Water
Ages: 4–8 years
Estimated Time: 5–10 minutes
What You'll Need:
- A shallow bowl
- Water
- Black pepper
- Liquid dish soap
How It's Done:
- Cover the bottom of the shallow bowl or dish with water.
- Sprinkle pepper on the surface of the water.
- Ask your child to stick their finger in the water. Does anything happen? Disclaimer: No.
- Now, dip their finger into liquid soap and ask them to stick it back into the pepper-water-dish. The pepper will magically float away!
How It Works:
Unfortunately, this trick isn't magic at all. However, it's a great way to teach your kids about the importance of washing their hands! The surface tension of the water allows the pepper flakes to float which makes this experiment so fun. The dish soap on your kid's finger will break the surface tension of the water and push the pepper away.
Because soap can break the tension of water, it's so effective on dirty dishes and hands. Just think of the pepper flakes as dirt or germs that soap can chase away.
8. Water Bender
Ages: 5–10 years
Estimated Time: 5 minutes
What You'll Need:
- A plastic comb
- Your kitchen faucet
- A head full of dry hair
How It's Done:
- Turn your faucet on slowly until you have a very thin stream of flowing water.
- Brush the plastic comb through your hair 10 or 15 times.
- Carefully bring the plastic comb close to the water and watch it bend toward the comb. Make sure not to get too close or you'll have to wait until the comb is dry to repeat the experiment.
How It Works:
After you brush through your hair, the plastic comb is negatively charged. Since water is positively charged, the comb pulls the water towards it, creating a bending effect.
9. Leakproof Water Bag
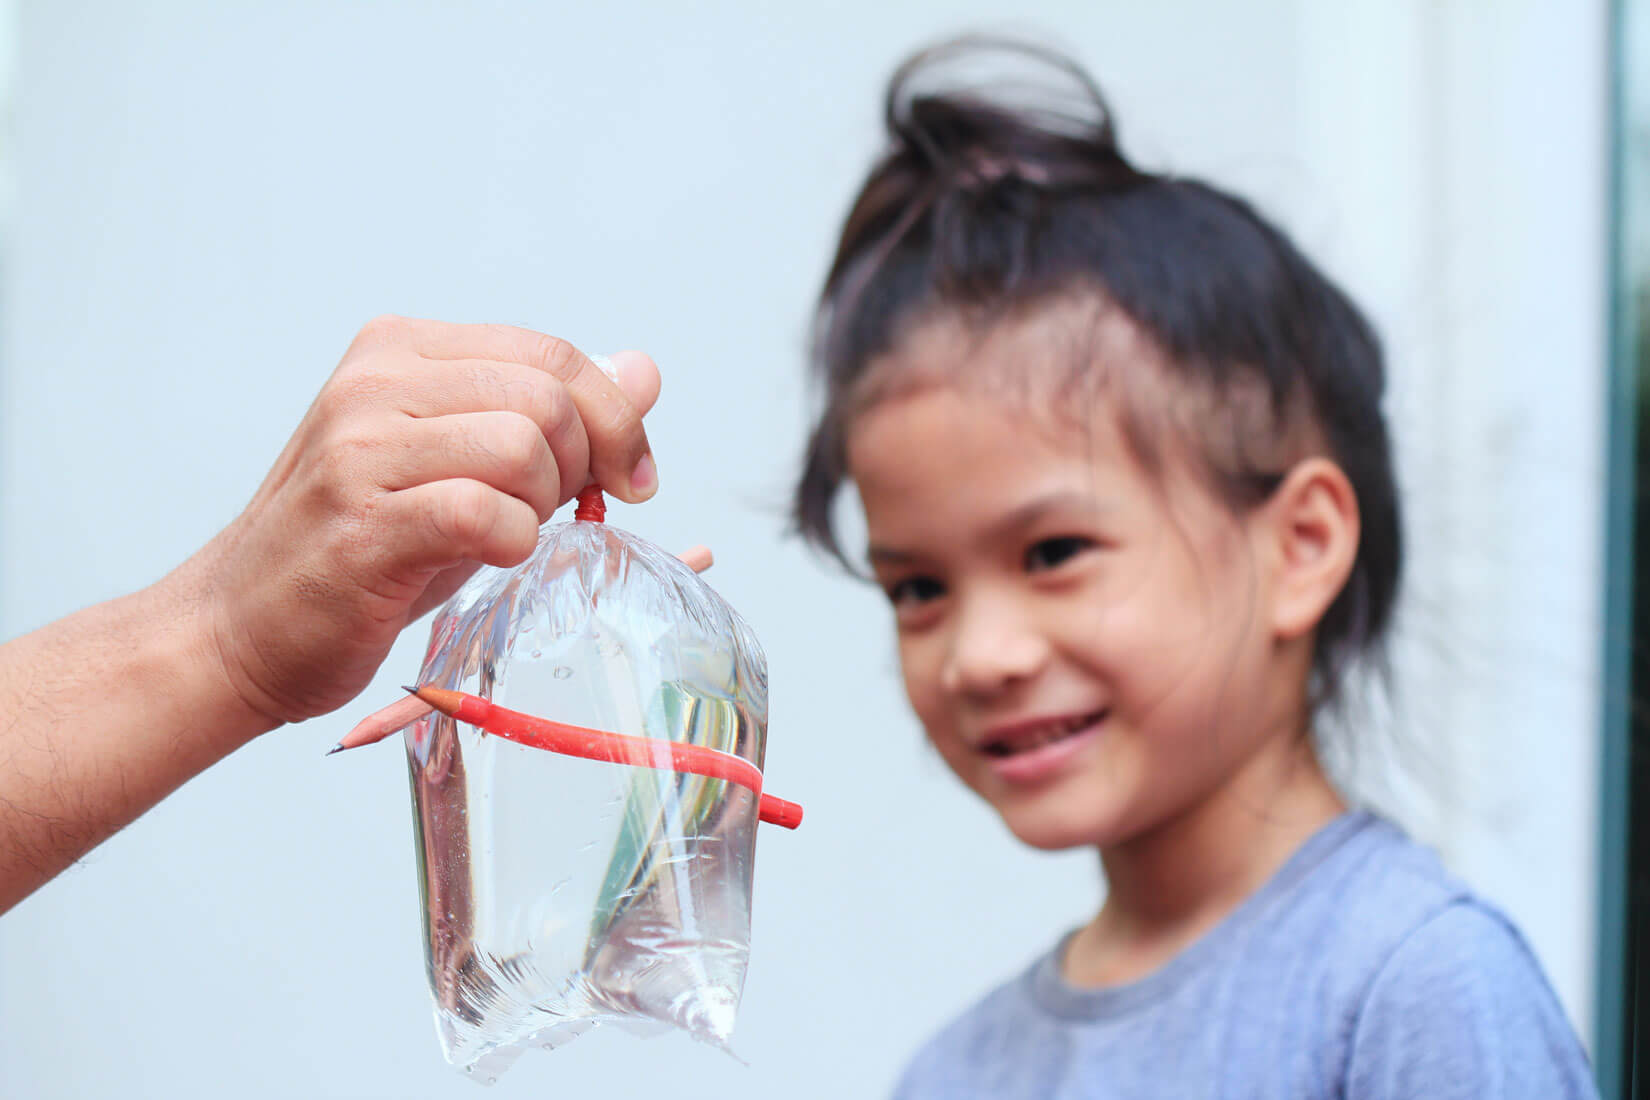
Ages: 4–10 years
Estimated Time: 10–15 minutes
What You'll Need:
- A gallon sized zip lock bag
- Water
- Sharp pencils
- A tray or towel
How It's Done:
- Fill the bag up with water and seal it.
- Hold it over the kitchen sink, a tray, or a towel to avoid a mess.
- Have one person hold the bag and another person stab a sharpened pencil straight through the bag as fast as they can.
- If you did it right, the pencil will poke out on both sides but no water will drop out of the bag. Keep stabbing the bag with as many pencils as you have!
How It Works:
The zip lock bag is made of polymer, a long, flexible chain of molecules. When you stab your pencil through it, the molecules spread apart and create a seal around the pencil so no water will leak out of it.
Hot And Cold
Does experimenting with ice and fire sound like fun to your kids? Thankfully, there are safe ways to do so in your kitchen, and you'll learn something too. Make sure to supervise your children when they're handling ice, lighters, or high percentage alcohols to recreate these science experiments. If you don't trust your kids to do these experiments indoors, gather everything you need from the kitchen first and then perform them outside in your backyard or on the balcony.
10. Hot Ice
Ages: 6–12 years
Estimated Time: 3–5 hours
What You'll Need:
- 1 liter of clear vinegar
- 4 Tbsp of baking soda
- Large saucepan
- Clear container
- Wood skewer
How It's Done:
- Slowly and carefully mix the baking soda and vinegar in your saucepan.
- Boil the mixture for about an hour over medium heat until a crystal skin or film forms on the surface.
- Remove the saucepan from the heat and pour it into another container. Cover it so no more liquid can evaporate.
- Place the covered container in your fridge to chill.
- Before cleaning out your saucepan, scrape some of the crystals from the bottom and save them for later.
- When the mixture is cold, take it out of the fridge.
- Take a wood skewer and dip it into the crystals so a little bit attaches to it. Then place the skewer in the container and watch as the crystals form into hot ice!
How It Works:
The baking soda and vinegar mixture is also called sodium acetate. When you place sodium acetate in the fridge, its temperature drops below the usual melting point and it becomes a supercooled liquid.
When you touch it or add some of the crystal to it, it freezes so fast that the ice actually produces heat. You can melt and cool the solution again to repeat the experiment. If you want to try a different approach, place a little bit of the crystals onto a cutting board or place and slowly pour the cold sodium acetate onto it to build a tower of ice.
11. Instant Ice
Ages: 5–10 years
Estimated Time: 3 hours
What You'll Need:
- An unopened bottle of distilled or purified water
- A bottle of drinking water
- Your freezer
How It's Done:
- Place both bottles in your freezer for about 2-1/2 hours depending on your freezer temperature.
- Once the drinking water is frozen, the distilled or purified water will be supercooled.
- Carefully take the supercooled water out of the freezer.
- To initiate crystallization, either shake the bottle or slowly pour it into a bowl to create a frozen stream of ice.
How It Works:
Supercooling is what happens when a liquid gets colder than its usual freezing point but doesn't crystalize yet. Distilled or purified water doesn't have any impurities that crystals can attach to, so the water can drop in temperature below its freezing point without crystallizing. Only if it's disturbed by shaking or pouring, crystals will form.
12. Homemade Ice Cream
Ages: 6+ years
Estimated Time: 20–25 minutes
What You'll Need:
- 1/2 cup of milk
- 1/2 cup of heavy cream
- 1/4 cup of sugar
- 1/4 tsp of vanilla extract
- 1 quart zip lock bag
- 1 gallon zip lock bag
- 2 cups of ice
- Thermometer
- 1/2 cup of table salt (sodium chloride)
How It's Done:
- Add the sugar and your wet ingredients to the smaller zip lock bag and seal the bag.
- Place the ice in the bigger zip lock bag then measure and record the temperature of the ice in the bag.
- Add 1/2 to 3/4 of table salt to the bag full of ice.
- Place the smaller bag inside of the larger bag with ice and seal it.
- Now rock the bag from side to side for about 10-15 minutes. Hold it by the seal or wear gloves so you don't hurt your skin!
- Open the bag and measure the temperature of the ice—it should be significantly colder.
- If you rocked the bag long enough, the mixture inside of the smaller bag will have turned into vanilla ice cream. Enjoy!
How It Works:
Salt lowers the freezing point of ice which makes it colder than it was before. This turns the mixture in the smaller bag into ice cream faster than it would in your freezer. If you have rock salt at home, this process will happen even faster because the larger crystals won't absorb into the ice as quickly. Just make sure to use sodium chloride!
13. Carbon Sugar Snake
Ages: 10–14 years
Estimated Time: less than an hour
What You'll Need:
- 1 tsp baking soda
- 4 tsp powdered sugar
- Single-use pie tin
- Enough sand to fill the pie tin
- Lighter fluid or ethanol
How It's Done:
- Combine the powdered sugar and baking soda in a bowl.
- Fill the pie tin with sand up to the rim and make a small mound in the middle. Then, make an indent in the mound with your hands.
- Pour enough lighter fluid or ethanol on the mound so that the sand is well soaked in the middle of the pie tin.
- Spoon your baking soda and sugar mixture into the center of the mound.
- Carefully light the sand near the mixture and watch the carbon sugar snake grow!
How It Works:
The carbon sugar snake is the product of not one, not two, but three chemical reactions happening at the same time! The first reaction happens when the sugar burns in the presence of oxygen. This chemical reaction produces two gases: carbon dioxide and water vapor.
These gases push more of the baking soda and sugar mixture upwards. Because not all of the sugar has access to oxygen, it can't burn. Instead, it heats up and undergoes thermal decomposition. This produces more water vapor and solid carbon, which gives the snake its black color.
The third chemical reaction happens because the baking soda decomposes under high heat. It produces solid sodium carbonate and more of the two gases. All of these reactions combined create the big black snake that keeps inflating until it grows outside of the pie tin.
The sand allows the heat to distribute evenly and ensures a steady, slow burn and growth of the carbon sugar snake.
14. Secret Messages
Ages: 6–14 years
Estimated Time: 10–15 minutes
What You'll Need:
- 1 lemon
- A glass
- A brush or cotton swab
- A piece of paper
- Heat source (electric stove, candle, or lighter)
How It's Done:
- Cut the lemon and squeeze the juice into a jar.
- Use the cotton swab or a brush to write or draw your secret message on a piece of paper.
- Let the lemon juice ink dry completely.
- When you're ready to reveal your message, ask your parents to help you heat up your paper over an electric stove until the invisible ink shows!
- If you don't have an electric stove at home, an adult can help you heat up the paper with a lighter or over a candle.
How It Works:
You will barely notice the lemon juice on the piece of paper once it's dry. As the invisible ink heats up, the lemon juice oxidizes and turns brown!
You can also try this experiment with milk, vinegar, or orange juice. If your kids want to send a secret letter to their friend, don't heat the paper up at home so the ink remains invisible. Include a little note for their friend so they know how to make it appear.
Food Science Experiments
Your child has probably heard you say "don't play with your food" during mealtime. When it comes to science experiments though, playing with food can teach you some cool lessons! Explore the depths of your olfactory senses with our printable or try some science fun with chicken eggs.
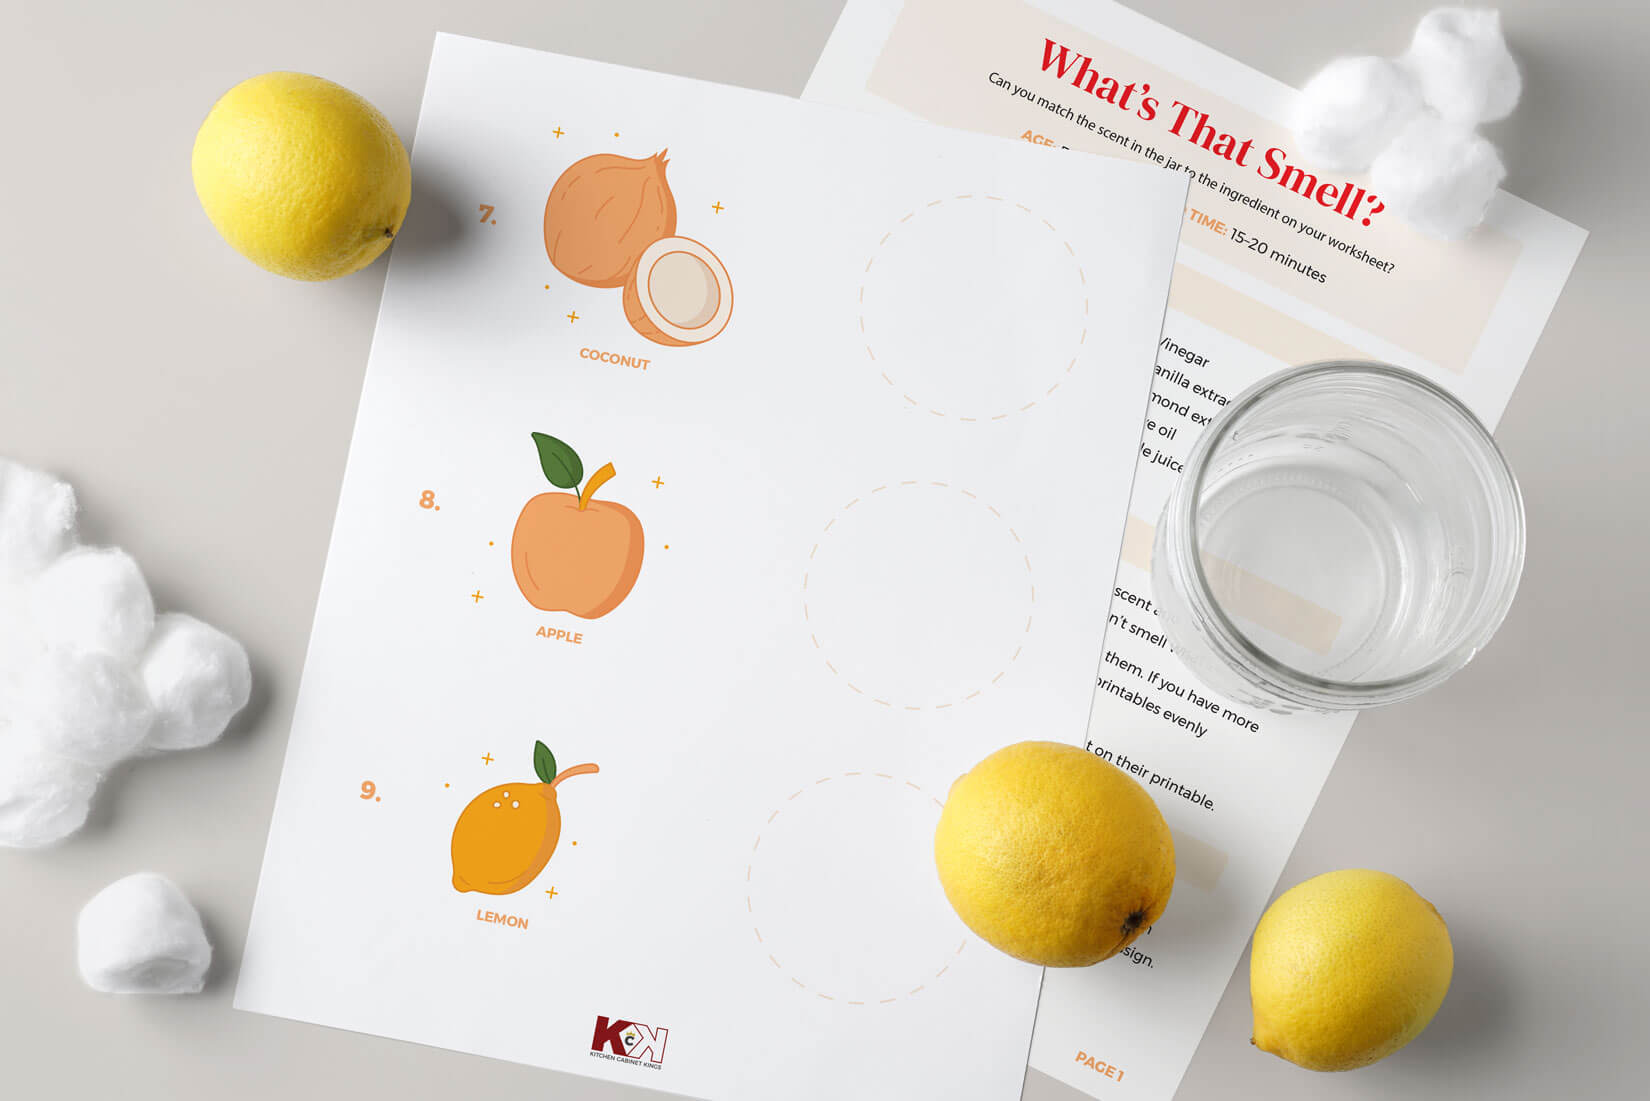
15. Olfactory Sensory Test
Ages: 5–10 years
Estimated Time: 15–20 minutes
What You'll Need:
- 9 small mason jars
- 9 cotton balls
- Fish oil
- Lemon juice
- Coconut oil (melted)
- A jar of garlic (minced or full)
- Vinegar
- Vanilla extract
- Almond extract
- Olive oil
- Apple juice
How It's Done:
- Print the olfactory sensory test.
- Dip each cotton ball in a different liquid to absorb the scent and then place them in separate jars. Close the mason jars with lids so you can't smell what's inside.
- Give your kid the printable and line the jars up in front of them. If you have more than one child who wants to play, distribute the jars and printables evenly between them.
- Now ask your them to match the smell in the jar to the ingredient on their printable.
How It Works:
This is a great experiment to teach your kids about olfaction, their sense of smell. Some scents like vinegar or garlic are very pungent and your kids will likely match them easily. Others like coconut or olive oil can be a little bit more difficult to assign.
If you have more ideas for scents to try out, create your own sheet!

16. Egg In A Bottle
Ages: 5+ years
Estimated Time: 20 minutes
What You'll Need:
- A hard-boiled and peeled egg (medium sized)
- A bottle, flask, or jar with an opening slightly smaller than the diameter of the egg
- Piece of paper and lighter or water
How It's Done:
- Set a small piece of paper on fire and drop it into the bottle. Place the egg on top of the bottle with the small side pointing down. When the fire goes out, the egg will get sucked into the bottle.
- If you don't want to start a fire, run the bottle under very hot tap water. Once it's hot and steamy inside, place the egg on top of the bottle and wait. As the bottle cools down, the egg will get sucked in.
- Lastly, you can set the egg on the bottle and place the bottle in a bowl of ice. When the bottle gets cold enough, the egg will again get sucked into it.
How It Works:
The egg drop is a fun and versatile experiment to do with your kids. Gravity alone will not let the egg push through the small opening of the bottle, but with the help of air pressure, you can create enough suction to get it inside.
In both versions of the experiment, the air inside of the bottle is hotter than the outside. When the bottle and the air inside it cools, the air pressure changes, pulling the egg into the bottle. Now you have to figure out how to get the egg out again!
Tip: Quickly blow air inside the bottle so it gets behind the egg and can push it out again.
17. Naked Egg
Ages: 6–10 years
Estimated Time: 2 days
What You'll Need:
- A raw egg
- A glass
- Vinegar
How It's Done:
- Carefully put the raw egg into the glass.
- Fill the glass with vinegar so the egg is fully submerged.
- Now you have to wait! After about 12 hours, you'll see a white foam building on top of the water. That's the dissolving egg shell.
- After 2 days, you can gently take the egg out of the vinegar and rinse it with water. You'll now have a squishy intact egg with no egg shell!
How It Works:
Making a naked egg requires patience but is definitely worth the wait. The acid of the vinegar dissolves the calcium carbonate that the eggshell is made out of. Once the eggshell is gone, the egg is held together by the membranes making it appear naked.
You can carefully bounce the egg around and even drop it from an inch above your kitchen counter. If you hold the egg up against a light, you can see the yolk inside!
More Kitchen Science Experiments
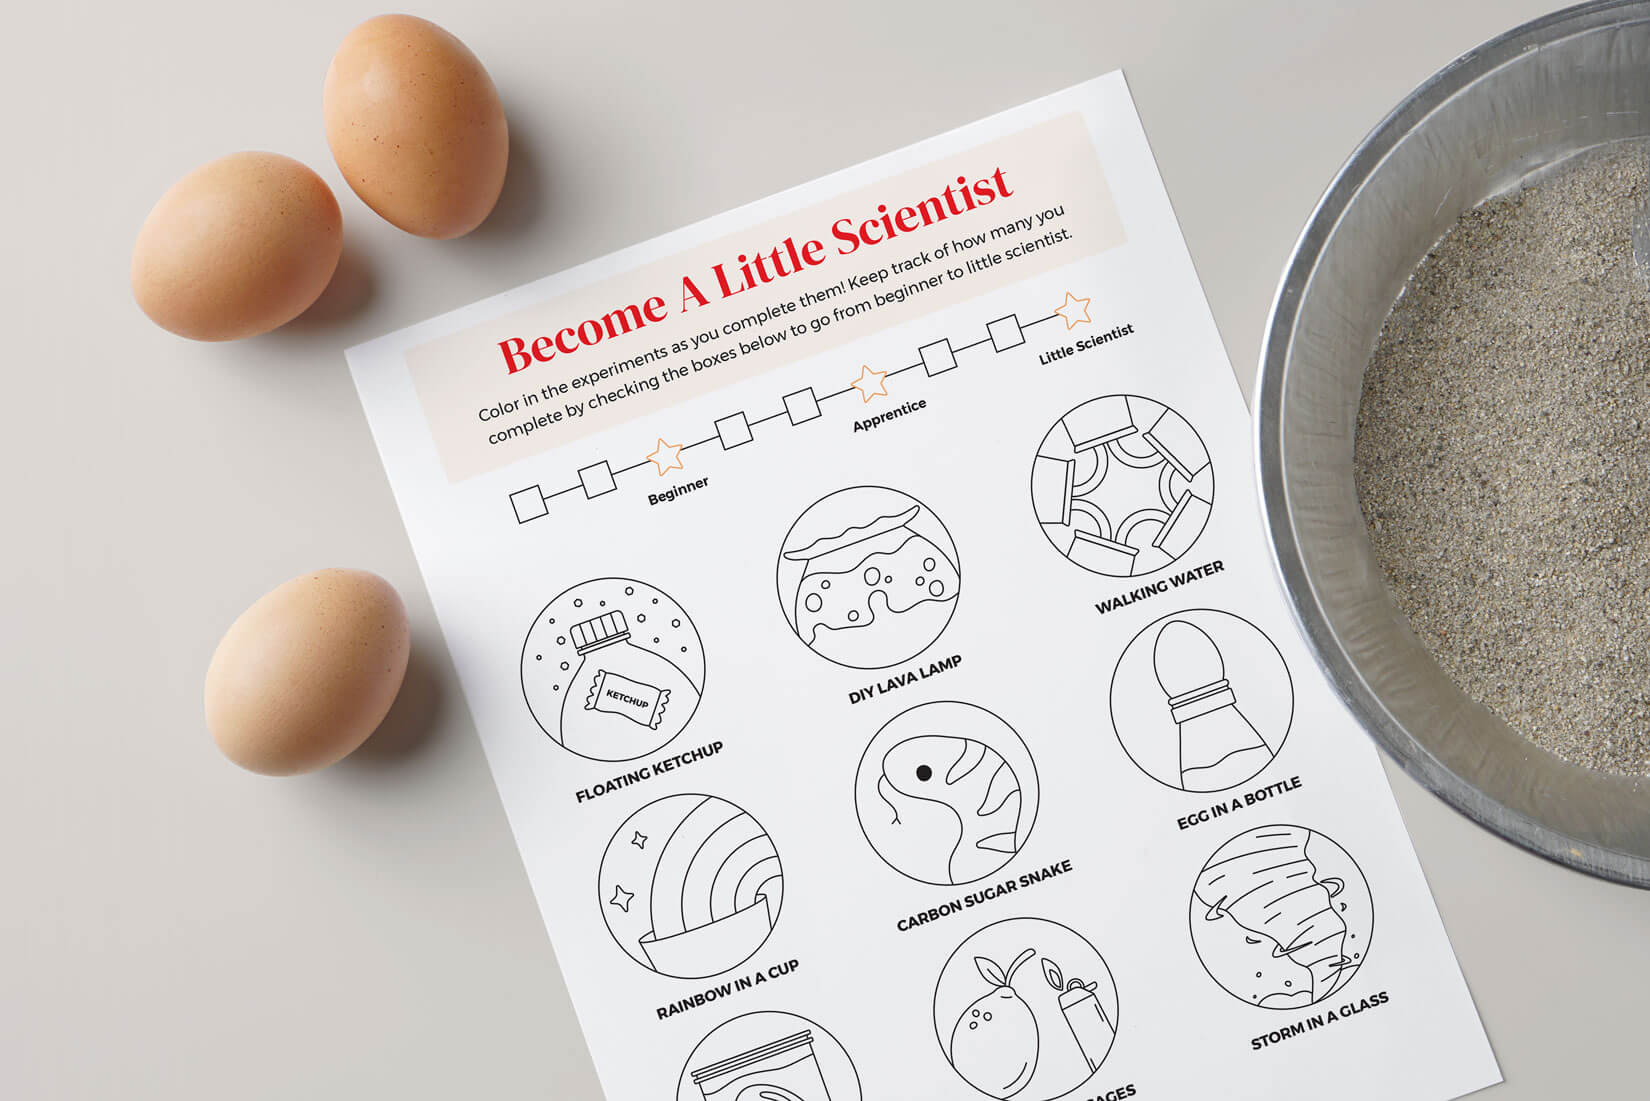
There are so many more experiments that you can try in your kitchen. Check out the links below and ask your kids what they're most interested in trying out. You can also print our little scientist coloring page that your kids can use as a tracker for how many experiments they've tried already.
- Make a S'more solar oven that will melt your marshmallows in the sun.
- Try this cute trick to make a stick figure float.
- Learn all about salt water density in this experiment.
- Make it sparkle with these underwater fireworks.
- DIY oobleck slime for a fun time with your kids.
- Use eggshells to make homemade chalk.
- Learn how to make plastic milk or casein.
- Show how strong you are with this bone bender experiment.
- Do your best to protect the egg from a fall using items from the kitchen.
- Make your own rock sugar crystals at home.
- Test pH with cabbage to learn more about acids and bases.
- Clean old coins with different household liquids.
- Find out how sugar affects your teeth using white eggs and sugary drinks of your choice.
- Lift an ice cube with nothing but a string.
- Make a glitter volcano erupt in your kitchen.

Hopefully, your kids enjoy these experiments and get excited about science. After all, science doesn't have to be dry and boring; it can be super interactive and a rather creative process! Together you can come up with all kinds of questions and alter the recipes to see what happens if you do things slightly differently. Make sure to supervise your kids at all times so your kitchen doesn't turn into a complete mess.


