Kitchen
How to Get Grease Off Kitchen Cabinets: 6 Methods for Every Mess
by Andrew Saladino
June 16, 2026
Grease has a way of sneaking up on your kitchen cabinets. You cook dinner, oil splatters, steam rises, and within a few months, the cabinet faces near the stove have a sticky film you did not notice building up. Eventually you run your hand across a cabinet door and realize the entire surface feels tacky.
The fix depends on how much grease you are dealing with. A light film that appeared over the past few weeks needs a different approach than years of caked-on buildup that has hardened into a sticky, amber-colored coating. This guide covers six cleaning methods organized from gentlest to most aggressive, so you can start with the easiest option and escalate only if you need to.
We also break down which methods are safe for different cabinet materials (wood, painted, and laminate), the specific areas that collect the most grease, and how to prevent the buildup from coming back once you have a clean surface.
Before You Start: Supplies and Safety
Before you grab a sponge, take five minutes to prepare. The right supplies and a quick test can save you from damaging your cabinet finish.
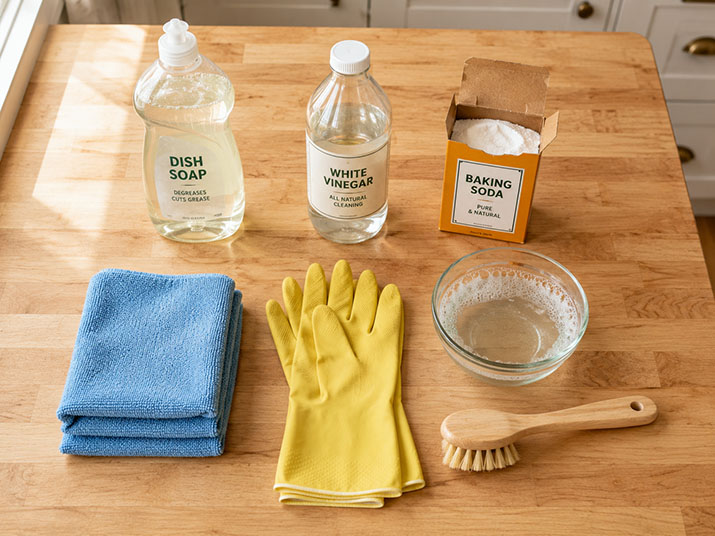
Gather your supplies. You will not need all of these for every method, but having them on hand means you can escalate to a stronger approach without stopping to run to the store:
- Microfiber cloths (at least three: one for cleaning, one for rinsing, one for drying)
- Dish soap (any brand works, Dawn is the most commonly recommended)
- White distilled vinegar
- Baking soda
- A soft-bristled brush or old toothbrush (for textured areas and around hardware)
- Rubber or nitrile gloves
- A spray bottle
- A bowl of warm water
Test first. Before you commit to any cleaning method, test it on a small, hidden area of one cabinet: the inside of a door, the underside of a face frame, or a spot near the floor that nobody sees. Wait 10 minutes and check for discoloration, finish damage, or changes in texture. This is especially important on painted cabinets, where the wrong cleaner can dull or strip the paint.
Know your cabinet material. Wood, painted, and laminate cabinets tolerate different cleaners. We cover the specifics in a dedicated section below, but the short version: avoid ammonia and abrasives on wood, avoid excess water on wood and laminate, and avoid scouring pads on painted surfaces. When in doubt, start with the gentlest method (dish soap and water) and work your way up.
6 Ways to Get Grease Off Kitchen Cabinets
These six methods are organized from gentlest to most aggressive. Start with Method 1 and move to the next one only if the grease does not come off. Most kitchen grease responds to the first two or three methods. The heavier options are for serious buildup that has been sitting for months or years.
Method 1: Dish Soap and Warm Water
Grease level: Light film, routine weekly cleaning
Safe for: Wood, painted, and laminate cabinets
This is the first method to try and the one you will use most often for regular maintenance. Dish soap is formulated to cut through cooking grease (the same reason it works on oily pots and pans), and it is gentle enough for every cabinet material.
Mix a few drops of dish soap into a bowl of warm water until it is slightly sudsy. Dip a microfiber cloth into the solution, wring it out so the cloth is damp (not dripping), and wipe down the cabinet surfaces. Work in the direction of the wood grain on wood cabinets. Pay extra attention to the area around handles and knobs, where grease from your hands accumulates.
Rinse the cloth in clean water and wipe the cabinets again to remove any soap residue. Then dry the surface with a clean, dry cloth. Leaving moisture on wood cabinets can cause the finish to cloud or the wood to swell, so do not skip the drying step.
Method 2: Vinegar and Water Solution
Grease level: Moderate grease, monthly deep cleaning
Safe for: Painted and laminate cabinets. Use cautiously on wood (test first).
Vinegar is a mild acid that breaks down grease more effectively than soap alone. Mix equal parts white distilled vinegar and warm water in a spray bottle. Spray the solution onto a microfiber cloth (not directly onto the cabinet, to avoid excess moisture reaching seams and edges). Wipe the cabinet face, applying light pressure on greasier spots.
For stubborn areas, spray the cloth more heavily and let it sit on the greasy spot for two to three minutes before wiping. The acid needs time to break the grease bond.
Rinse with a clean damp cloth and dry thoroughly. Vinegar can dull the finish on some wood cabinets over time, so if you have natural wood or stained wood cabinets, test this method on a hidden spot first and limit how often you use it. For painted and laminate cabinets, vinegar is safe for regular use.
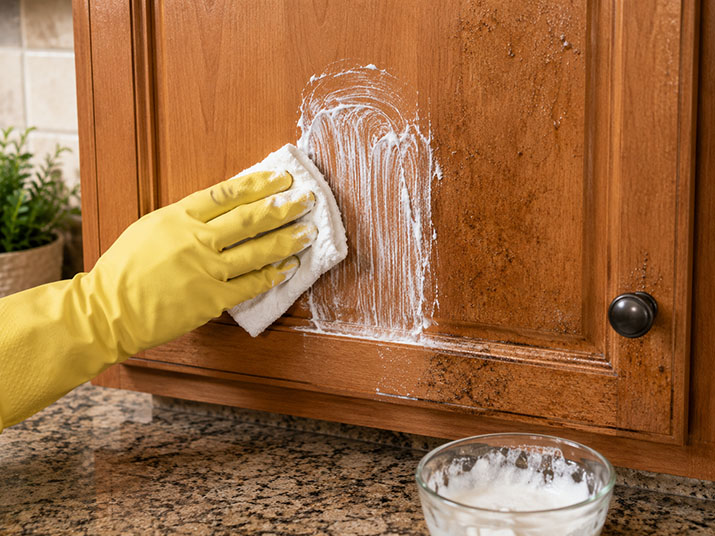
Method 3: Baking Soda Paste
Grease level: Stubborn spots, sticky buildup, localized problem areas
Safe for: Wood and laminate cabinets. Avoid on painted cabinets (mildly abrasive).
Baking soda is a gentle abrasive that physically lifts grease rather than dissolving it chemically. Mix two tablespoons of baking soda with one tablespoon of warm water to form a thick paste. Apply the paste directly to the greasy area with a soft cloth or your fingers and rub in small circles. Let the paste sit for five to ten minutes on heavier spots, then wipe it away with a damp cloth.
The mild grit in baking soda does the work that liquid cleaners cannot: it gets under the grease layer and separates it from the cabinet surface. This makes it the best option for individual stubborn spots where dish soap or vinegar left grease behind.
Avoid using baking soda paste on painted cabinets. The abrasive texture can scratch or dull paint finishes, especially on matte or satin paints. On wood cabinets with a clear coat, baking soda is safe as long as you do not scrub aggressively.
Method 4: Oil-Based Wood Cleaner
Grease level: Moderate to heavy grease on wood surfaces
Safe for: Wood cabinets (stained, sealed, or natural). Not recommended for painted or laminate.
This sounds counterintuitive: use oil to remove oil? It works. Oil-based cleaners like Murphy’s Oil Soap dissolve grease while conditioning the wood underneath at the same time. They are designed for wood surfaces and will not strip the finish the way vinegar or ammonia can.
Dilute the oil soap according to the label (Murphy’s recommends 1/4 cup per gallon of warm water). Dip a cloth in the solution, wring it out, and wipe the cabinet surfaces. The oil component loosens the grease while the soap emulsifies it so you can wipe it away. Rinse with a clean damp cloth and buff dry.
If you have natural wood or stained wood kitchen cabinets, this is the safest and most effective method for regular grease removal. It cleans and conditions in one step, which means less drying and less wear on the finish over time.
Method 5: Commercial Degreaser
Grease level: Heavy buildup, multiple layers of old grease, entire cabinet runs
Safe for: Painted, laminate, and metal cabinets. Test on wood first (some degreasers strip finishes).
When dish soap and baking soda are not cutting through the buildup, a commercial degreaser is the next step. Products like Krud Kutter Kitchen Degreaser, Ecolab Heavy-Duty Citrus Degreaser (under $6 at most hardware stores), and Zep Heavy-Duty Citrus Degreaser are designed for this job.
Spray the degreaser onto a cloth or directly onto the cabinet surface (check the label for application instructions). Let it sit for the recommended time, usually one to three minutes, then wipe with a clean cloth. Most commercial degreasers do not require rinsing, but wiping with a damp cloth afterward removes any chemical residue.
Wear gloves when using commercial degreasers. Even the plant-based citrus formulas can irritate skin with prolonged contact. Work in a ventilated space: open a window or turn on the range hood fan.
If you have wood cabinets, test the degreaser on a hidden area first. Some formulas are too harsh for certain clear coats and can leave a cloudy or stripped appearance.
Method 6: Ammonia Solution (Last Resort)
Grease level: Severe buildup that resisted all other methods
Safe for: Laminate and metal cabinets ONLY. Do not use on wood or painted cabinets.
Ammonia is the most aggressive cleaning option on this list. It cuts through grease that nothing else will touch, including hardened, years-old buildup that has become a varnish on the cabinet surface. But it comes with real risks, and it should be your last option.
Mix one tablespoon of household ammonia into one quart of warm water. Dip a cloth into the solution, wring it out, and wipe the greasy surface. Work in small sections and rinse each section with clean water immediately after cleaning.
Safety rules for ammonia:
- Open windows and turn on the range hood before you start. Ammonia fumes are strong and can irritate your eyes, nose, and lungs.
- Wear rubber gloves and avoid skin contact with the solution.
- Never mix ammonia with bleach. The combination produces chloramine gas, which is toxic. If you have used bleach on any surface in the kitchen recently, do not use ammonia until the bleach has been fully rinsed and dried.
- Do not use ammonia on wood cabinets. It will strip the finish, discolor the wood, and can raise the grain.
- Do not use ammonia on painted cabinets. It can dull, soften, or peel paint.
Ammonia is effective on laminate and metal cabinet fronts where the surface can handle a strong chemical without damage. For wood and painted cabinets with severe grease, a commercial degreaser (Method 5) or professional refinishing is a better path.
How to Clean Grease Off Different Cabinet Types
Not every cabinet can handle the same cleaner. The material your cabinets are made from determines which methods are safe and which ones risk damaging the finish.
Wood Cabinets
Wood is the most common cabinet material and the most sensitive to moisture and chemical exposure. Water left sitting on wood can cause swelling, clouding, and finish damage. Ammonia and strong degreasers can strip the clear coat.
Safe methods: Dish soap and water (Method 1), oil-based cleaner like Murphy’s Oil Soap (Method 4), and baking soda paste for spot treatment (Method 3). Vinegar (Method 2) is safe for occasional use but should not be a regular habit on wood.
Avoid: Ammonia, bleach, abrasive scouring pads, and excess water. Always wring your cloth out until it is barely damp before wiping wood surfaces.
If you are cleaning wood cabinets and want to learn more about maintaining different cabinet door styles and finishes, our door styles guide covers the care differences between flat-panel, raised-panel, and shaker options.
Painted Cabinets
Painted cabinets tolerate more moisture than bare wood, but the paint layer is vulnerable to scratching from abrasives and dulling from strong chemicals.
Safe methods: Dish soap and water (Method 1), vinegar and water (Method 2), and commercial degreasers formulated for painted surfaces (Method 5, test first).
Avoid: Baking soda paste (too abrasive for paint), ammonia (can dull or peel paint), scouring pads, and steel wool.
Laminate Cabinets
Laminate is the most forgiving material for cleaning. The plastic surface resists moisture and most chemicals better than wood or paint. The main risk with laminate is heat (steam cleaners can loosen the adhesive bond) and abrasive scrubbing that can scratch the surface.
Safe methods: All six methods work on laminate. Start gentle and escalate as needed.
Avoid: Steam cleaners applied at close range for extended periods, steel wool, and anything that could gouge the surface.
Where Grease Builds Up the Most
Grease does not coat your cabinets evenly. It concentrates in predictable zones, and knowing where to focus your cleaning effort saves time.
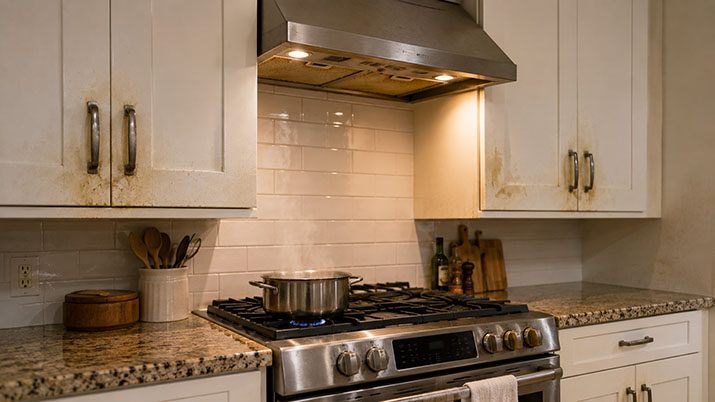
Cabinet faces next to the stove. These take the worst hit. Oil splatters and cooking steam coat the two or three cabinet doors closest to the range. The lower portions of these doors (countertop height and below) get the heaviest buildup because that is where splatter lands.
Handles and knobs. Your hands transfer cooking oil, butter, and food residue to the hardware and the cabinet surface around it every time you open a door while cooking. The area within two inches of each handle is almost always greasier than the rest of the door.
Cabinet faces above the stove. Rising steam carries aerosolized cooking oil upward and deposits it on the cabinet bottoms and faces above the range. This area often gets missed during routine cleaning because you do not see it at eye level.
The range hood and surrounding trim. If your range hood does not vent outside (recirculating hoods are common in apartments and older kitchens), the grease it captures cycles back into the kitchen air and settles on nearby surfaces. The underside of the hood and the cabinet faces around it are prime targets.
Upper cabinet door tops. The top edge of upper cabinet doors collects a fine layer of grease-laden dust over time. You rarely see it because it is above eye level, but run a finger across the top of a cabinet door after six months without cleaning and you will find a sticky film.
How to Remove Years of Grease Buildup from Kitchen Cabinets
If your cabinets have not been deep-cleaned in years, the grease has likely hardened into a thick, sticky layer that standard dish soap will not touch. This is the most common scenario we hear about from homeowners who are cleaning cabinets they inherited from a previous owner or tackling a kitchen they have lived in for a decade without doing a full cabinet wipe-down.
Here is the approach for heavy, old grease:
Start with a commercial degreaser. Spray it on and let it sit for the full recommended time. Heavy buildup needs dwell time for the degreaser to penetrate the layers. Wipe away with a clean cloth and repeat if the first pass leaves residue.
Follow with a baking soda paste on stubborn spots. After the degreaser loosens the bulk of the grease, a baking soda paste (Method 3) handles the remaining sticky patches. Apply the paste, let it sit for ten minutes, and scrub gently with a soft-bristled brush.
Use a toothbrush around details. Panel grooves, routed edges, and the recessed areas of shaker cabinet doors trap grease in crevices that a flat cloth cannot reach. An old toothbrush dipped in your cleaning solution gets into these tight spots.
Finish with a rinse and conditioning step. Wipe every surface with a clean cloth dampened with plain water to remove chemical residue. Dry thoroughly. On wood cabinets, follow up with a wood conditioner or a small amount of Murphy’s Oil Soap to restore moisture and sheen to the wood.
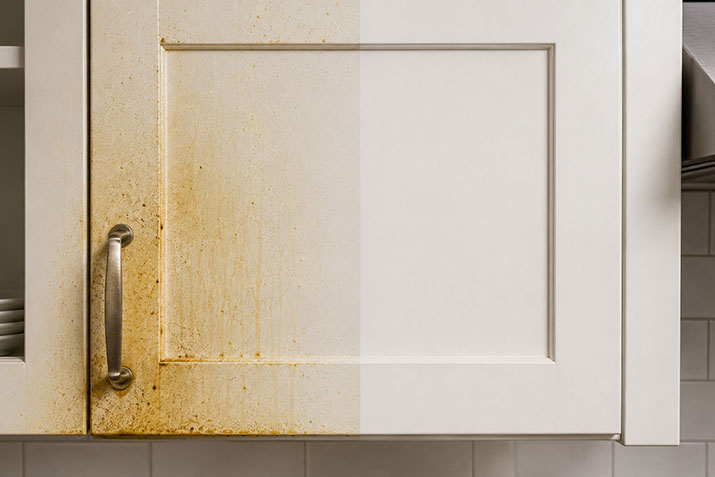
Set realistic expectations. If the grease has been sitting for years, some staining may be permanent, especially on lighter wood tones and white paint. Cleaning will remove the sticky texture and most of the discoloration, but a faint shadow may remain where the heaviest buildup sat. If the staining is severe enough that cleaning cannot fully restore the appearance, it may be time to consider refinishing or replacing the cabinet doors.
How to Prevent Grease Buildup on Kitchen Cabinets
Removing grease is satisfying, but preventing it from accumulating in the first place is a better use of your time. These habits keep your cabinets cleaner for longer.
Wipe down stove-adjacent cabinets after every greasy meal. You do not need a full cleaning session. A quick pass with a damp cloth after frying, sauteing, or roasting removes the fresh grease before it has time to harden. Thirty seconds of wiping tonight saves thirty minutes of scrubbing next month.
Use your range hood every time you cook with oil. The range hood fan pulls grease-laden steam and aerosolized oil away from your cabinets and either vents it outside or captures it in a filter. Turn it on before you start cooking and leave it running for a few minutes after you finish. If your hood has a grease filter, clean or replace it every one to three months.
Clean cabinet handles weekly. Handles collect grease faster than any other surface because you touch them with cooking hands multiple times a day. A 10-second wipe with a damp cloth once a week keeps them from becoming sticky.
Do a full cabinet wipe-down once a month. A monthly pass with dish soap and water (Method 1) across all cabinet faces prevents grease from building to the point where you need a stronger cleaner. Focus on the stove-adjacent doors, the range hood area, and the handles.
Consider a cabinet liner for interiors. If grease migrates to the inside of your cabinets (common when the stove is next to a cabinet end), shelf liners protect the interior surfaces and can be replaced cheaply when they get dirty.
For a complete approach to cabinet care beyond grease, our guide on how to clean kitchen cabinets covers dust, fingerprints, food stains, and routine maintenance for every cabinet material.
When Cleaning Is Not Enough
Sometimes the grease is gone but the damage it left behind is not. Cabinets that sat under heavy grease for years can show permanent discoloration, finish wear, or a rough texture where the grease ate into the clear coat.
If you are in that situation, you have two options:
Refinish the doors. Sanding down to bare wood and reapplying stain and clear coat can restore a set of cabinet doors to like-new condition. This is labor-intensive but far cheaper than replacing the entire cabinet run.
Replace the doors or the full cabinets. If the grease damage is severe, or if you have been thinking about updating the kitchen anyway, a full cabinet refresh is the cleaner path forward. At Kitchen Cabinet Kings, we carry RTA kitchen cabinets and assembled kitchen cabinets in styles that ship direct and install in a weekend. If you want to test a finish before committing, order a cabinet door sample and hold it up next to your countertops in person.
Need help planning the layout? Our free 3D kitchen design service pairs you with a certified designer who builds a layout around your space, your style, and your budget.
Frequently Asked Questions
What is the best homemade degreaser for kitchen cabinets?
A mixture of equal parts white vinegar and warm water works well for moderate grease. For stubborn spots, make a paste with two tablespoons of baking soda and one tablespoon of warm water, apply it to the greasy area, let it sit for five to ten minutes, and wipe it away. Dish soap diluted in warm water is the safest everyday option for all cabinet types.
How do you remove years of grease buildup from kitchen cabinets?
Start with a commercial degreaser like Krud Kutter or Ecolab Citrus Degreaser. Spray it on, let it sit for one to three minutes, and wipe clean. Follow with a baking soda paste on remaining sticky spots. Use a toothbrush to clean grease from panel grooves and around hardware. Rinse with plain water and dry thoroughly. On wood cabinets, finish with an oil-based wood conditioner to restore the finish.
Can you use vinegar on wood kitchen cabinets?
Vinegar is safe for occasional use on wood cabinets, but it should not be your regular cleaning method. The mild acidity can dull the finish on stained or sealed wood over time. For routine cleaning of wood cabinets, dish soap and warm water or an oil-based cleaner like Murphy’s Oil Soap are safer long-term options. Always test vinegar on a hidden area first and dry the surface immediately after wiping.
How often should you clean grease off kitchen cabinets?
Wipe down the cabinet faces near the stove and the handles after every greasy cooking session. Do a full wipe-down of all cabinet faces with dish soap and water once a month. Deep clean with a stronger method (baking soda, vinegar, or a commercial degreaser) every three to six months, or whenever you notice grease buildup starting to feel sticky.
Is it safe to use baking soda on painted cabinets?
Baking soda is mildly abrasive and can scratch or dull painted cabinet finishes, especially matte and satin paints. For painted cabinets, stick with dish soap and water, vinegar and water, or a commercial degreaser designed for painted surfaces. If you need to use baking soda on a painted cabinet, apply it with a very soft cloth and use minimal pressure.
What causes grease buildup on kitchen cabinets?
Cooking with oils, butter, and fats releases aerosolized grease particles into the air as steam and splatter. These particles settle on nearby surfaces, especially the cabinet faces closest to the stove, handles, the range hood area, and cabinet bottoms above the cooking surface. Over time, the particles bond with dust and harden into a sticky film. Kitchens without a range hood or with a recirculating hood tend to accumulate grease faster.
Can grease damage kitchen cabinets permanently?
Yes, if left untreated for a long time. Grease can penetrate wood finishes and cause permanent discoloration, especially on lighter stains and white-painted surfaces. On wood cabinets, long-term grease exposure can break down the clear coat, leaving the wood vulnerable to moisture damage. On painted cabinets, grease can yellow the paint. Routine cleaning prevents permanent damage. If the finish is already compromised, refinishing or replacing the cabinet doors may be needed.
Should you clean the inside of kitchen cabinets too?
Yes, especially if your cabinets are near the stove or if you notice a sticky film on dishes and glassware stored inside. Grease vapor can penetrate closed cabinet doors and settle on interior surfaces. Wipe the inside shelves with dish soap and water every few months and consider using shelf liners that can be replaced when they get dirty.
Andrew Saladino
Andrew Saladino is the Co-Founder of Kitchen Cabinet Kings and has spent more than a decade helping over 110,000 homeowners make more confident kitchen remodeling decisions. Recognized by the NKBA for his expertise in kitchen design, he writes about cabinet styles, design trends, remodeling costs, lead times, and the details homeowners often don't think about until it's too late.


